> ## Documentation Index
> Fetch the complete documentation index at: https://docs.isotopes.ai/llms.txt
> Use this file to discover all available pages before exploring further.
# NetSuite Connector
The NetSuite connector lets aidnn pull data directly from your NetSuite account for analysis.\
Setup happens in two places a few steps in aidnn, a few steps in NetSuite.
## 1. Add the NetSuite connector in aidnn
### Open the Connectors page
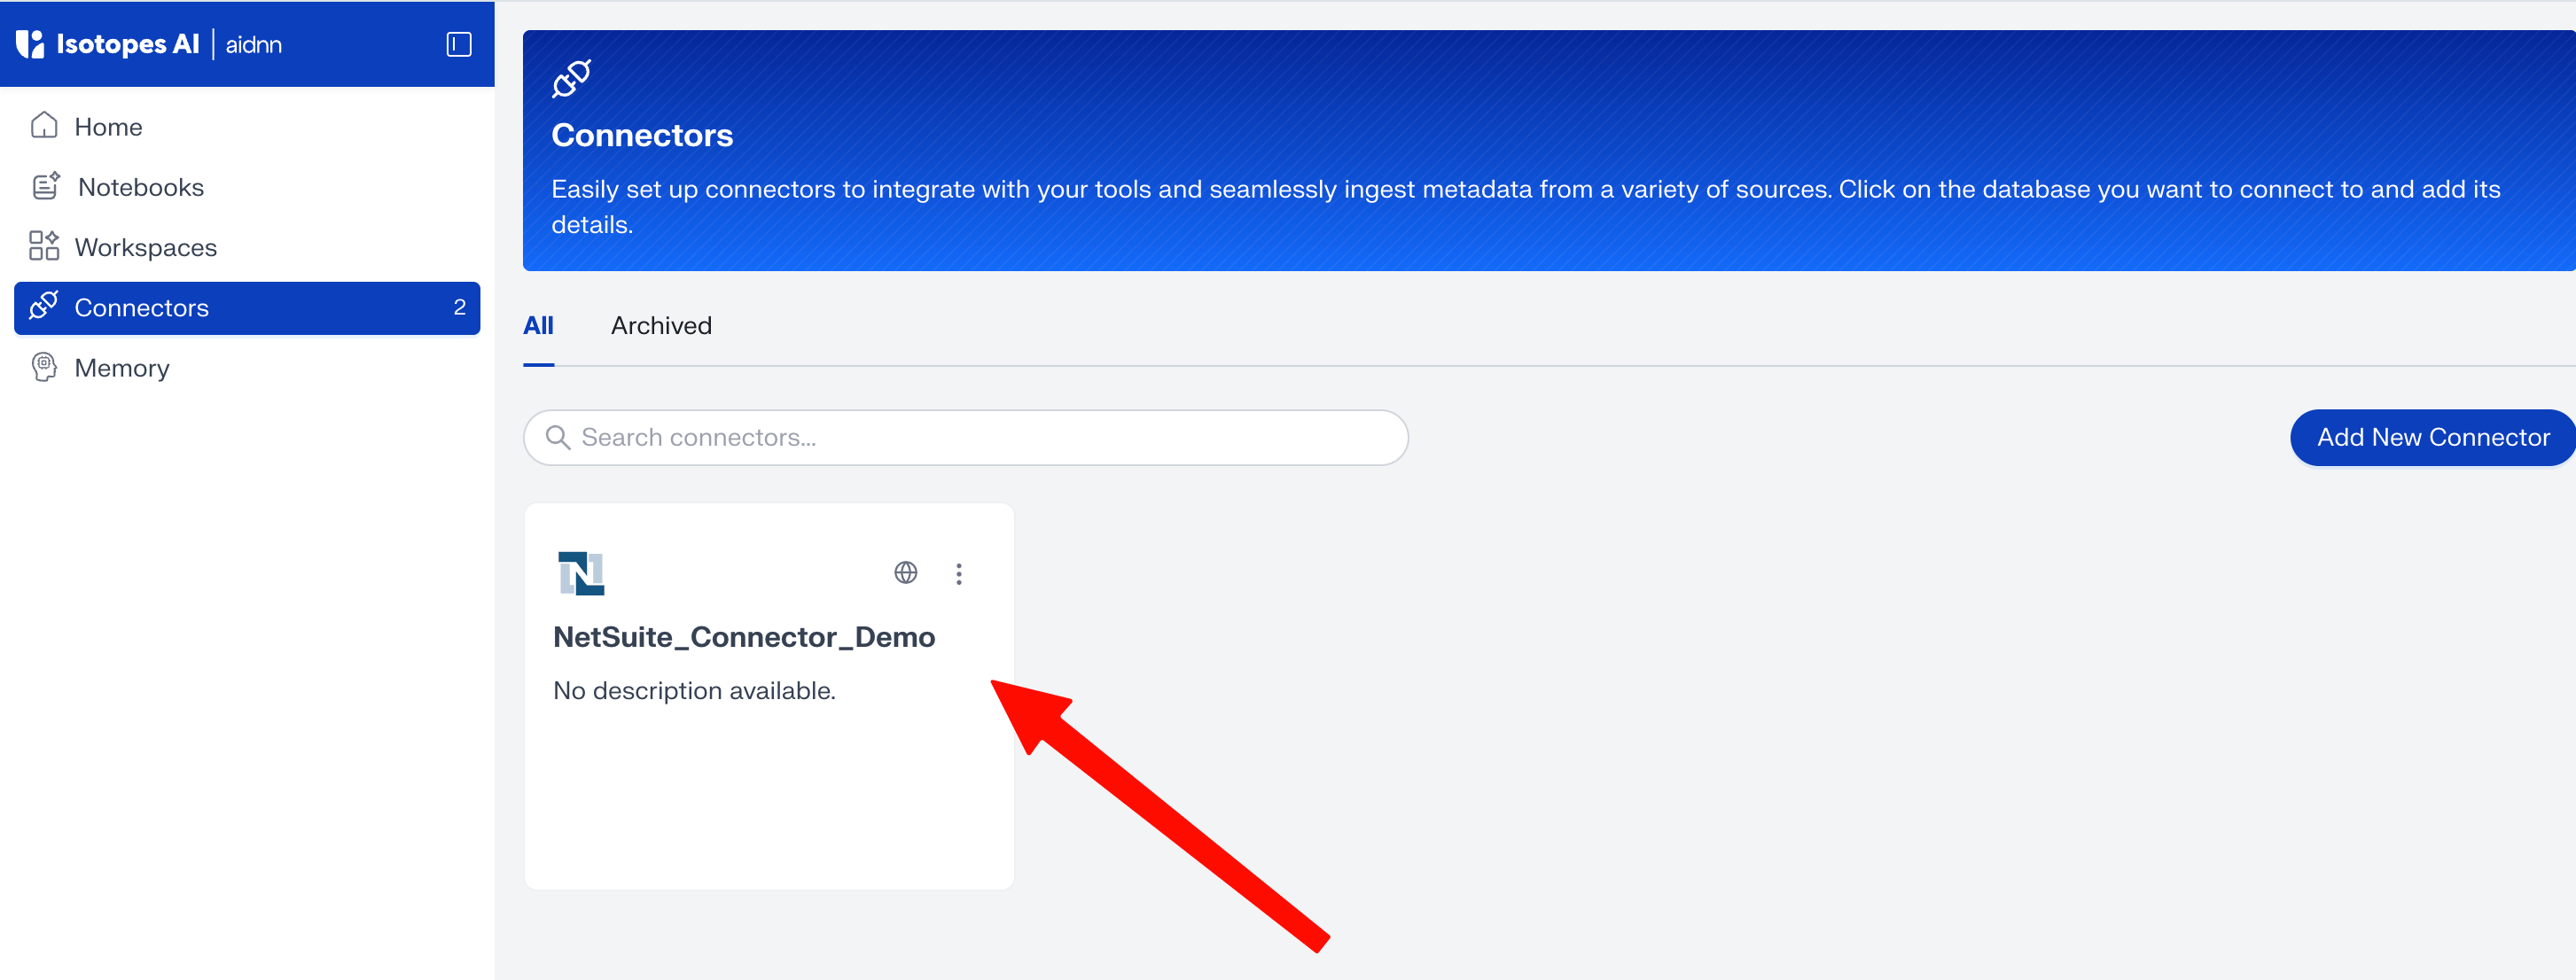
From the aidnn home screen, click **Connectors** in the left sidebar.
 ### Start a new connector
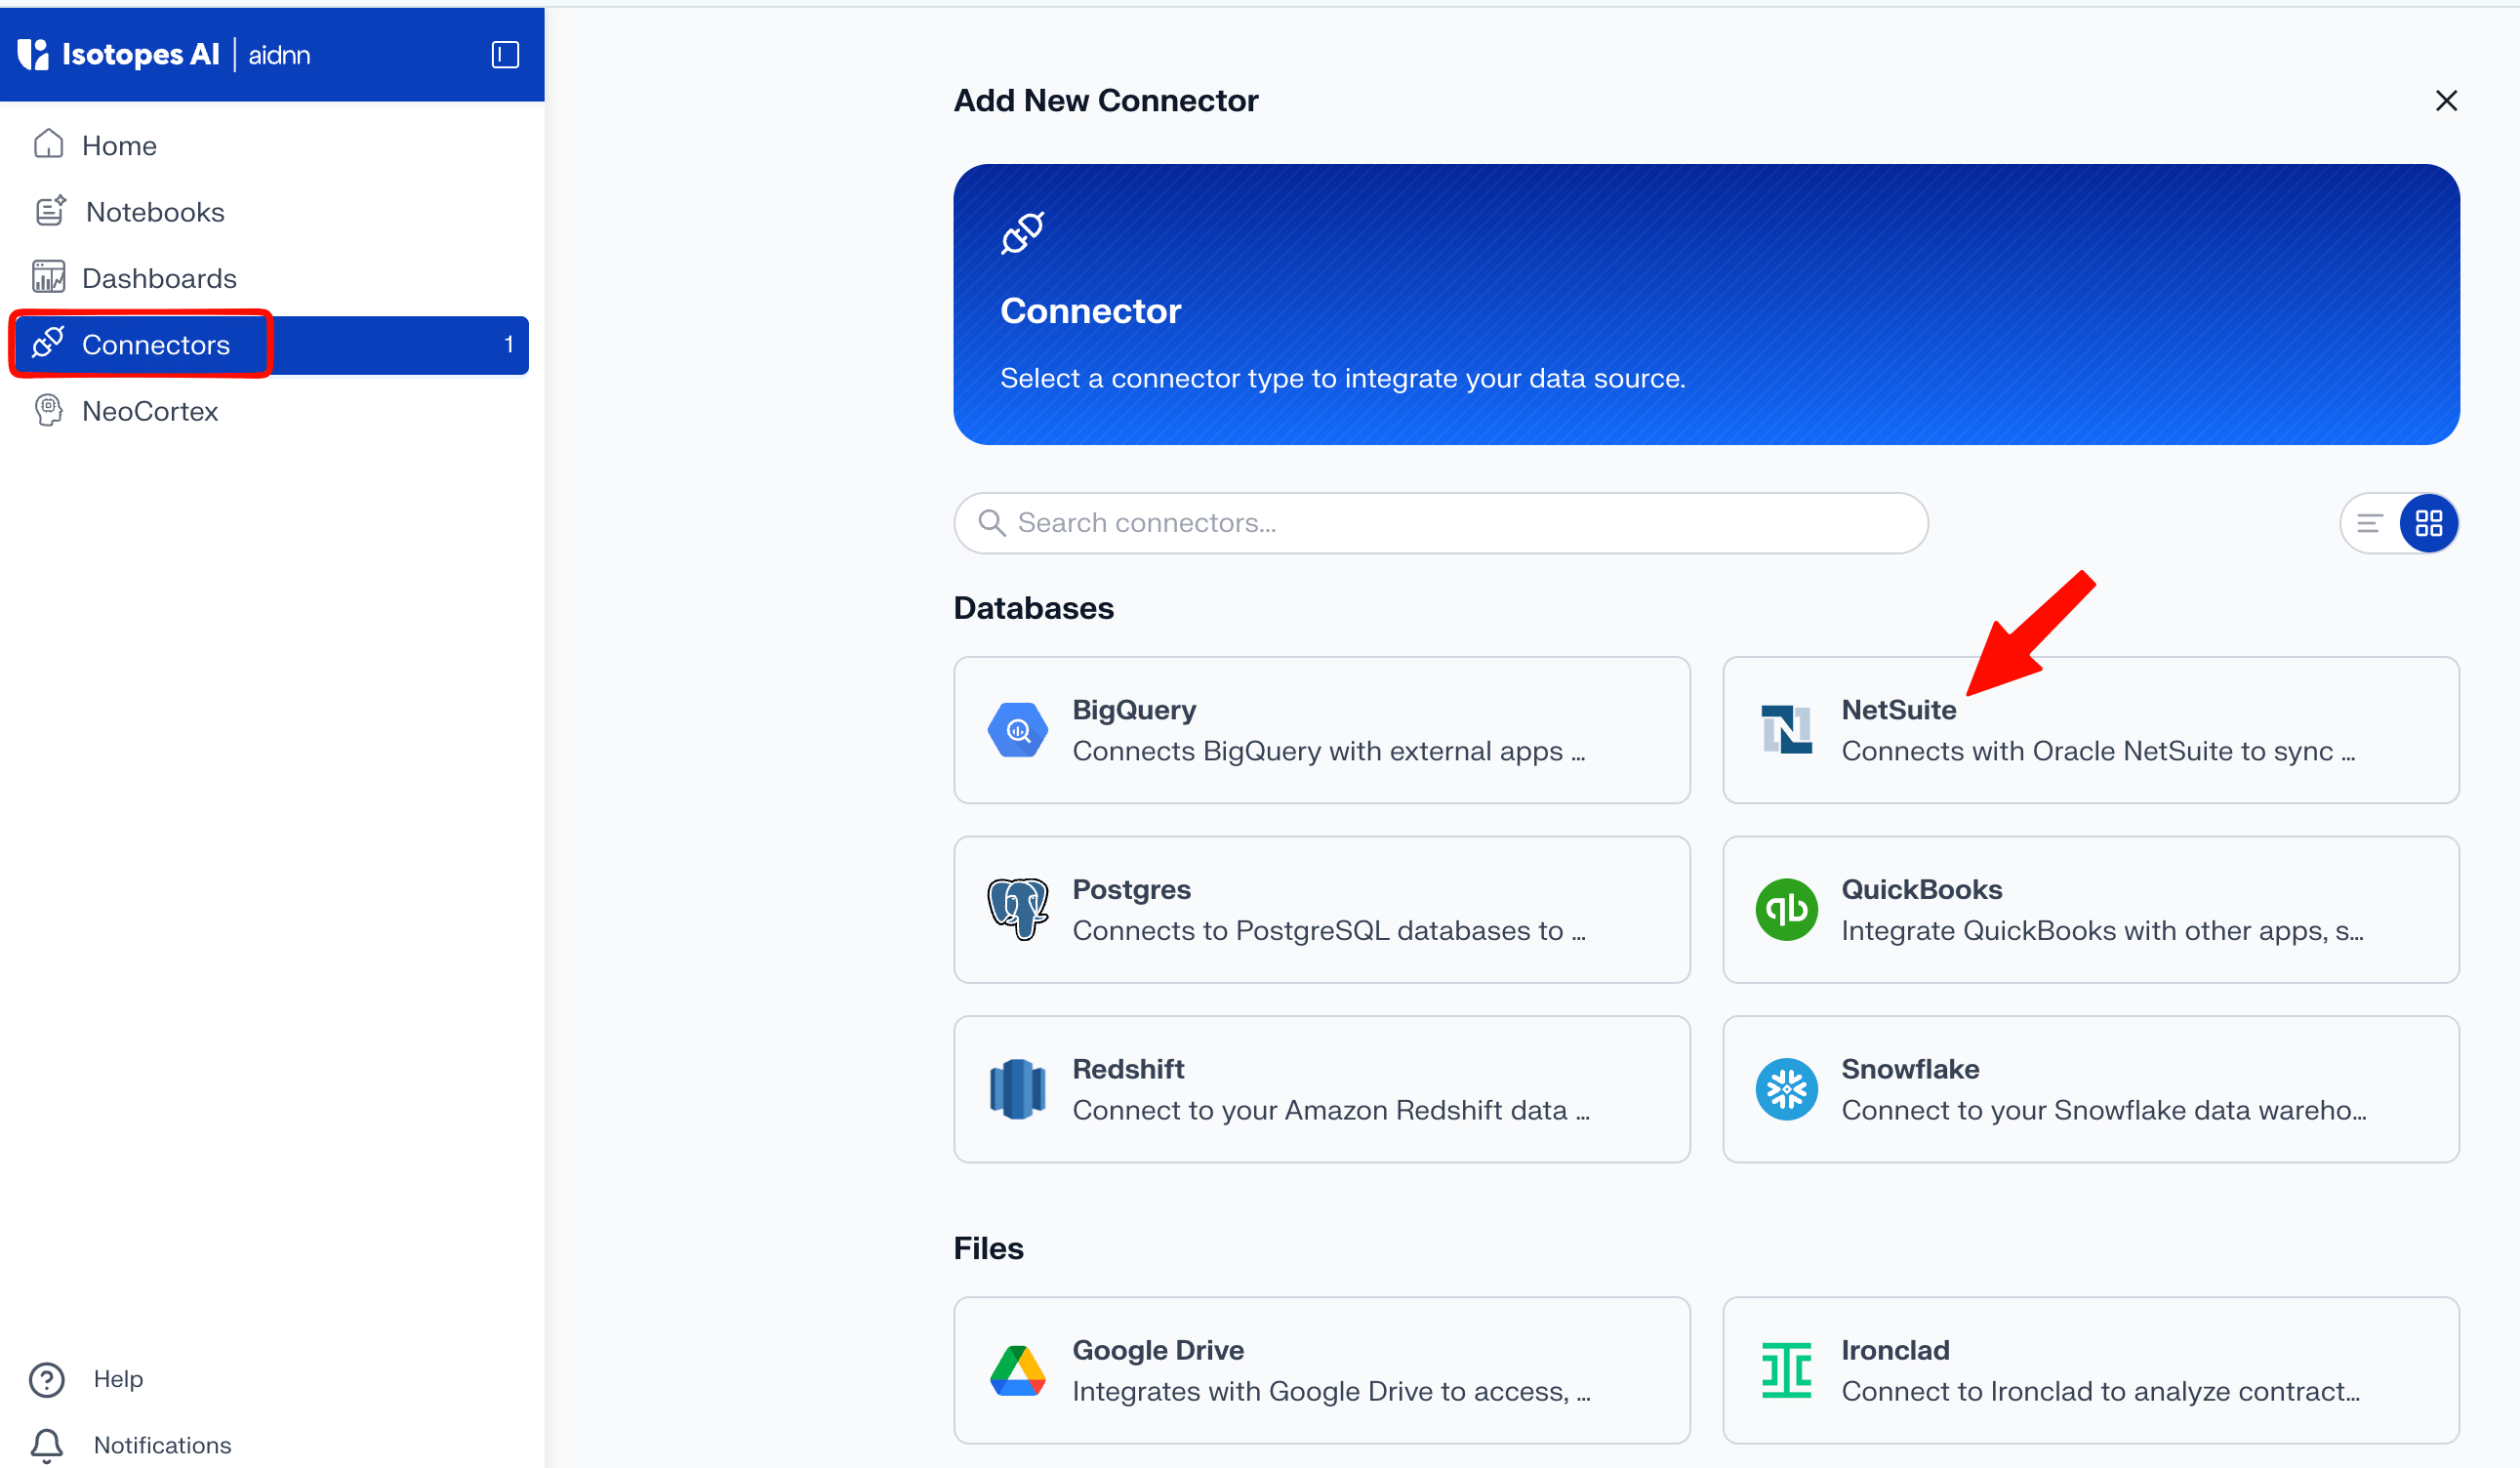
On the Connectors page, click **Add New Connector** in the top-right corner.\
You’ll be taken to a page that lists every available connector.
### Pick NetSuite
Select **NetSuite** in the list. This opens the **Add New NetSuite Service** page.
### Name the service
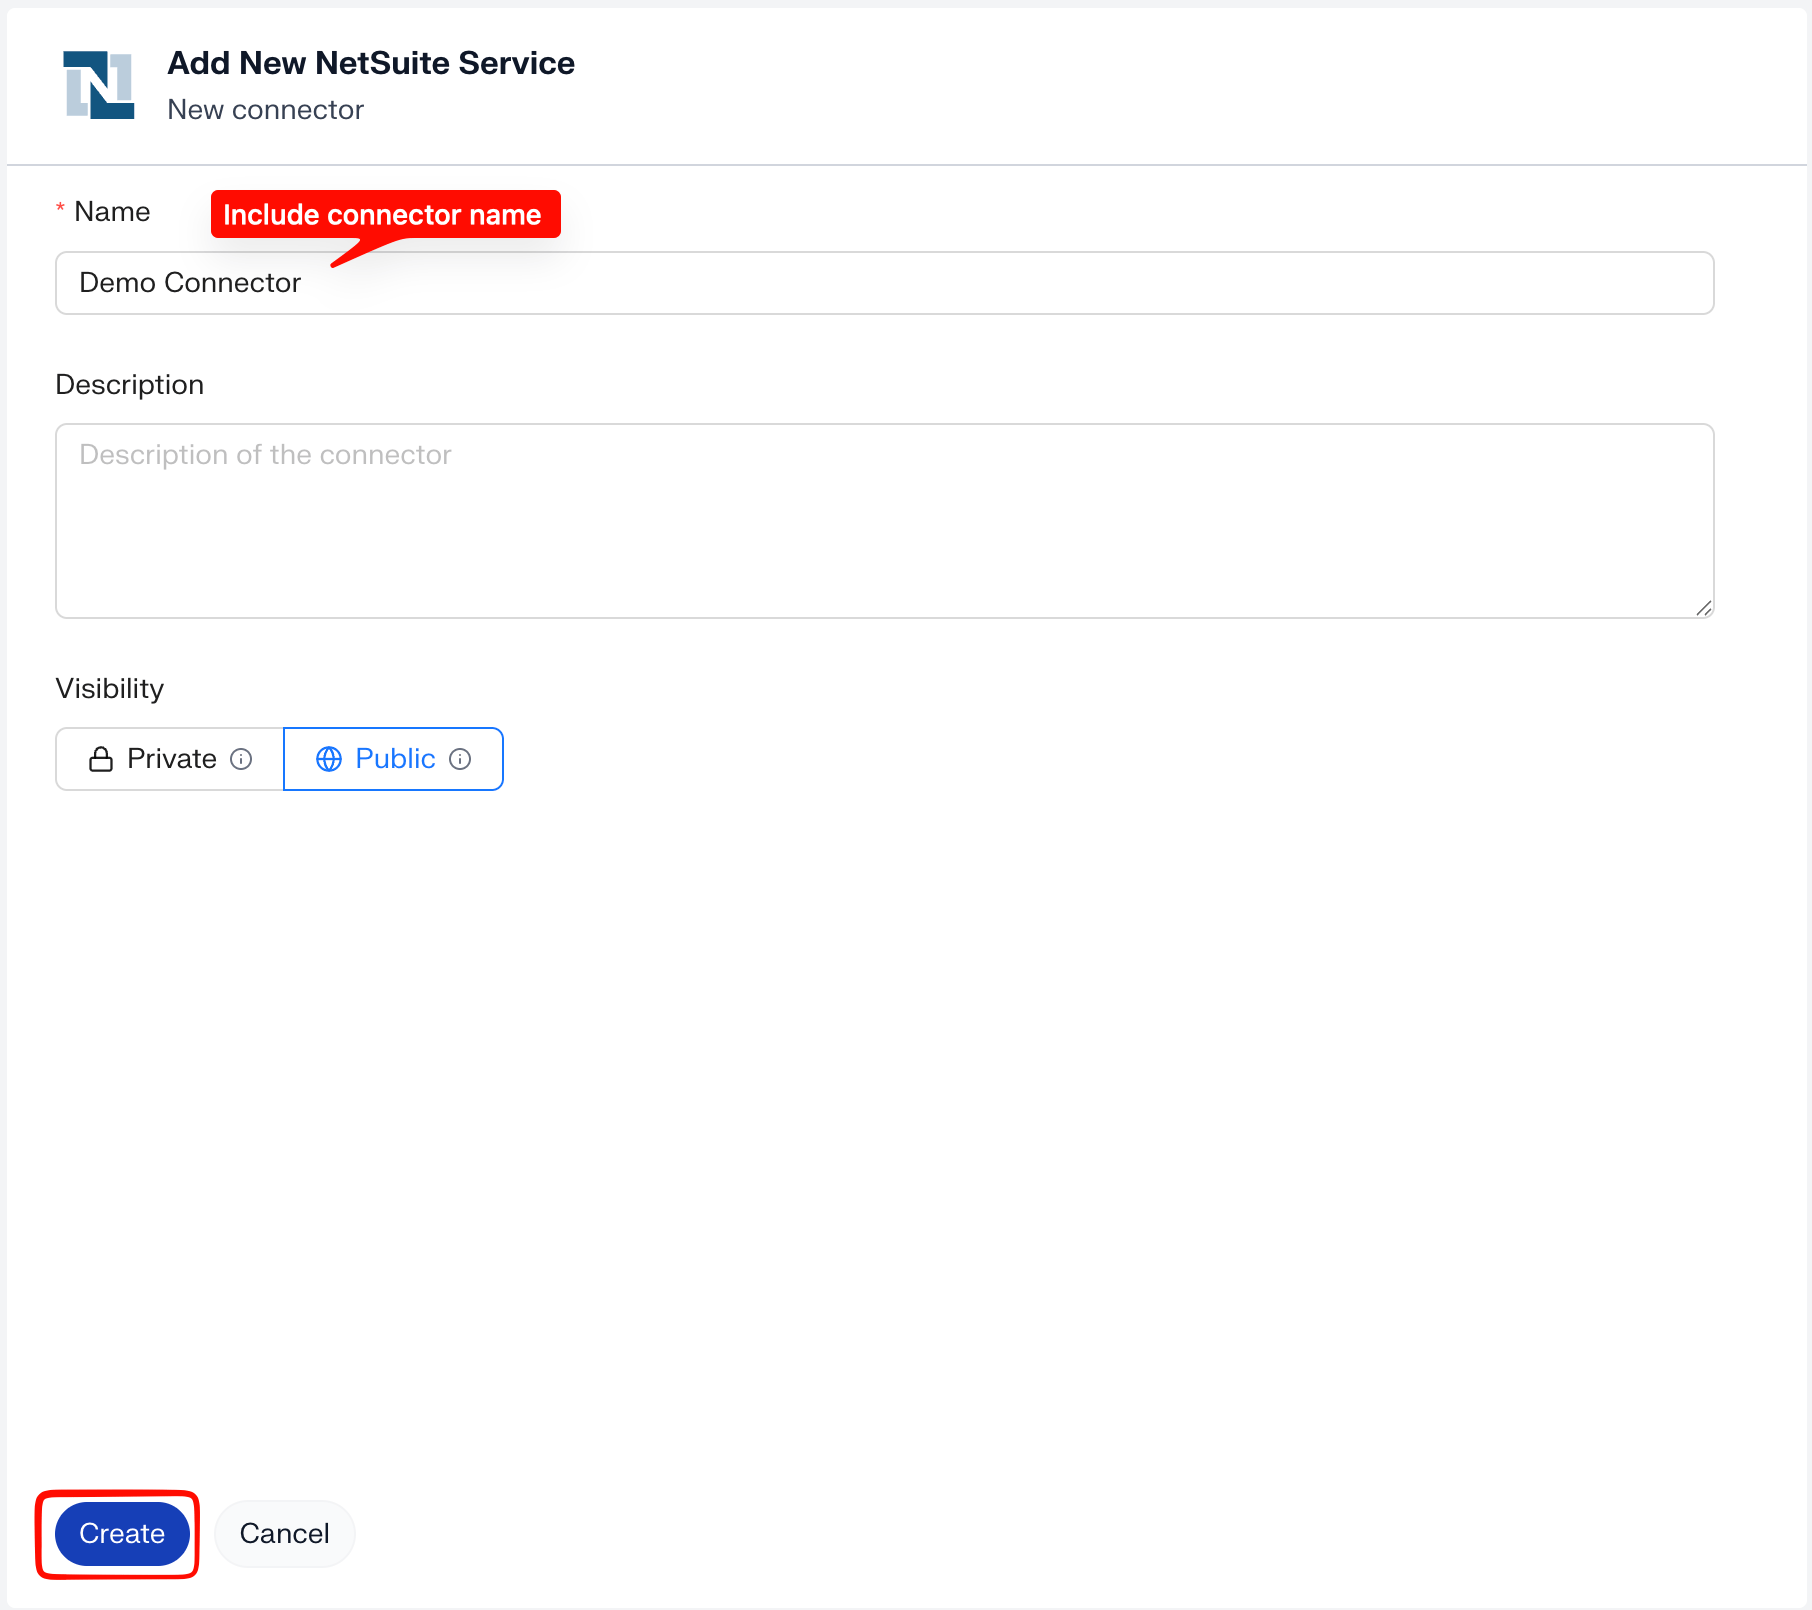
Enter a name and an optional description for the connector. Choose a visibility **Public** (everyone in your org can use it) or **Private** (only you) then click **Add**.
### Start a new connector
On the Connectors page, click **Add New Connector** in the top-right corner.\
You’ll be taken to a page that lists every available connector.
### Pick NetSuite
Select **NetSuite** in the list. This opens the **Add New NetSuite Service** page.
### Name the service
Enter a name and an optional description for the connector. Choose a visibility **Public** (everyone in your org can use it) or **Private** (only you) then click **Add**.
 ### Click Authenticate
aidnn takes you to the connector configuration page. Click **Authenticate** to begin connecting your NetSuite account.
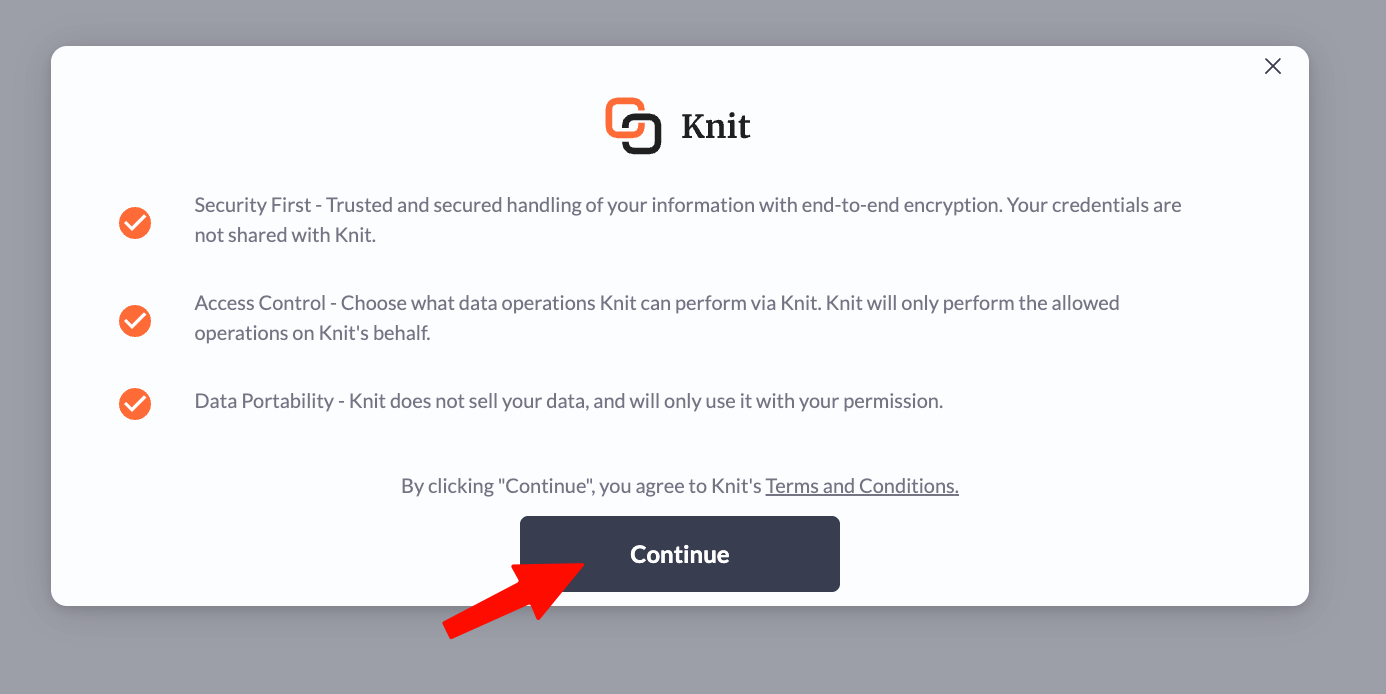
A new tab opens. Click **Continue** to proceed.
### Click Authenticate
aidnn takes you to the connector configuration page. Click **Authenticate** to begin connecting your NetSuite account.
A new tab opens. Click **Continue** to proceed.
 ## 2. Find your NetSuite Account ID
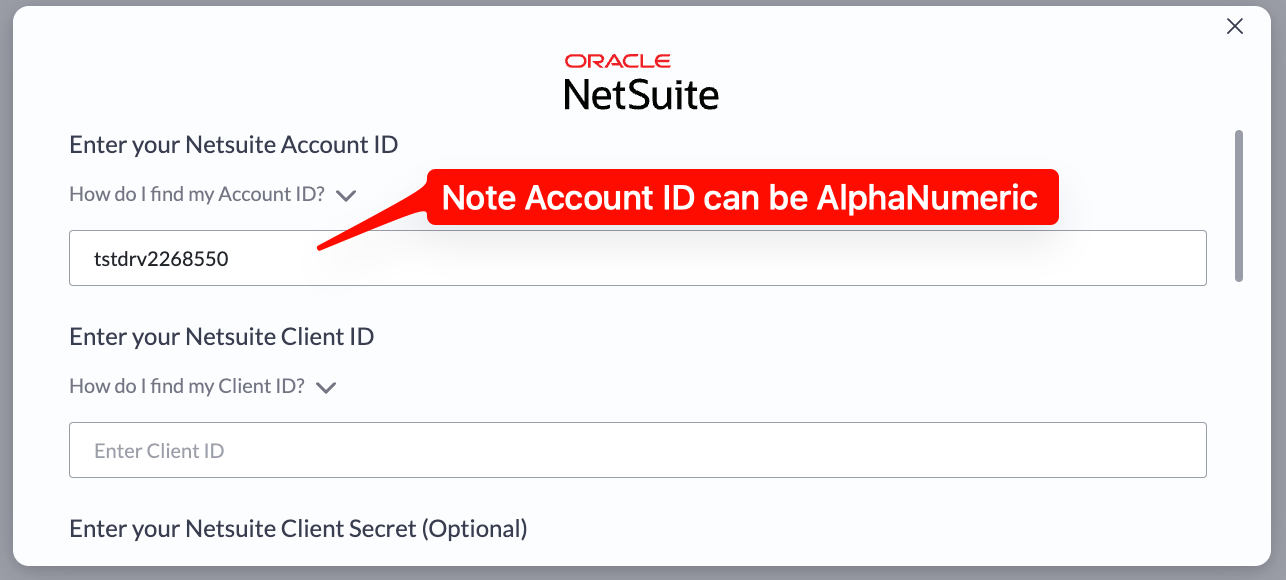
Log in to NetSuite. Once you’re in, look at the URL in your browser’s address bar it follows the format [*https://1234567.app.netsuite.com*](https://1234567.app.netsuite.com). The alphanumeric string before *.app* is your **Account ID**. Copy it and paste it into the aidnn connector configuration.
## 2. Find your NetSuite Account ID
Log in to NetSuite. Once you’re in, look at the URL in your browser’s address bar it follows the format [*https://1234567.app.netsuite.com*](https://1234567.app.netsuite.com). The alphanumeric string before *.app* is your **Account ID**. Copy it and paste it into the aidnn connector configuration.
 ## 3. Enable the required NetSuite features
To generate a Client ID later on, NetSuite needs a few features turned on. They allow NetSuite to accept external API connections, run scripts, and support secure authentication — everything the aidnn connector needs to communicate with your NetSuite instance.
### Step 1 - Open Enable Features
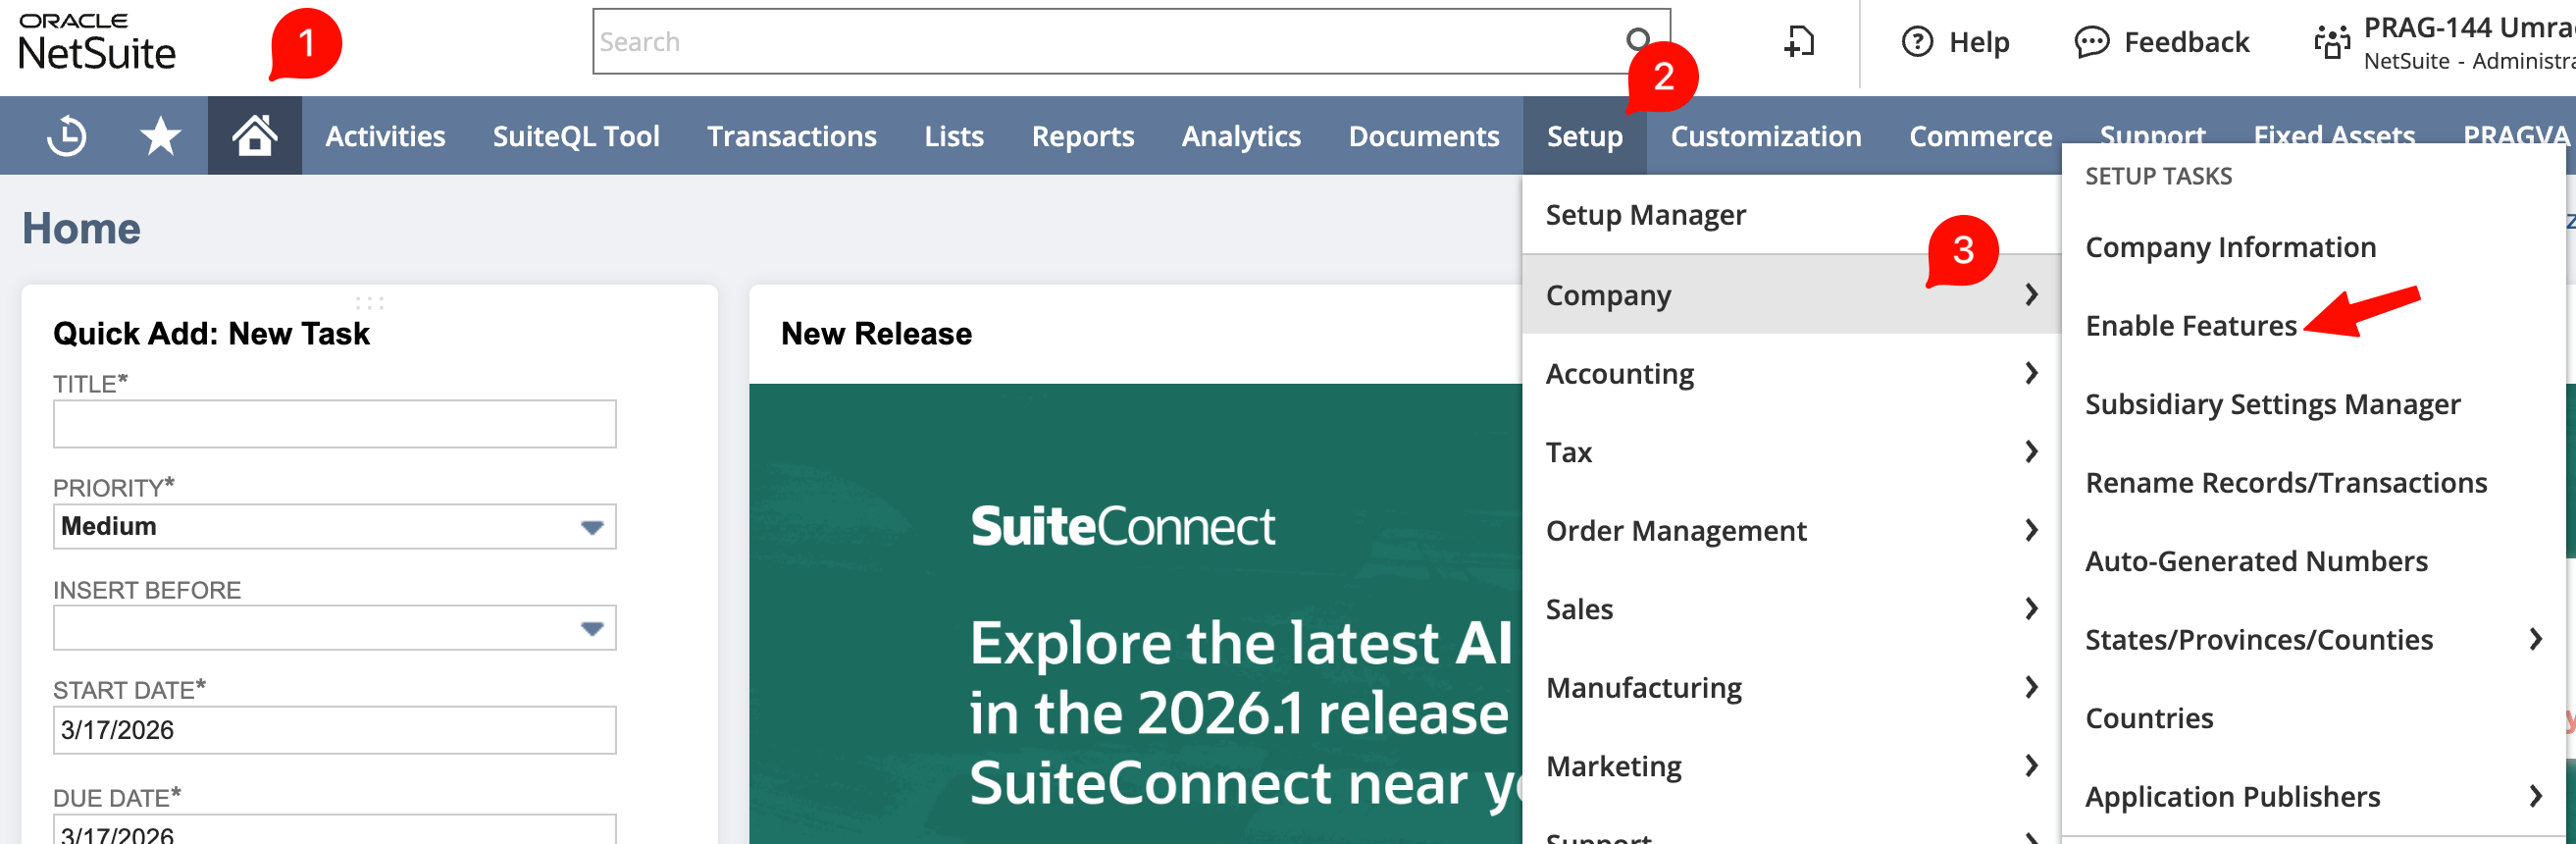
In NetSuite, go to **Home › Setup › Company › Enable Features**. This page lets you manage which features are active in your NetSuite environment.
## 3. Enable the required NetSuite features
To generate a Client ID later on, NetSuite needs a few features turned on. They allow NetSuite to accept external API connections, run scripts, and support secure authentication — everything the aidnn connector needs to communicate with your NetSuite instance.
### Step 1 - Open Enable Features
In NetSuite, go to **Home › Setup › Company › Enable Features**. This page lets you manage which features are active in your NetSuite environment.
 ### Step 2 - Turn on the required features
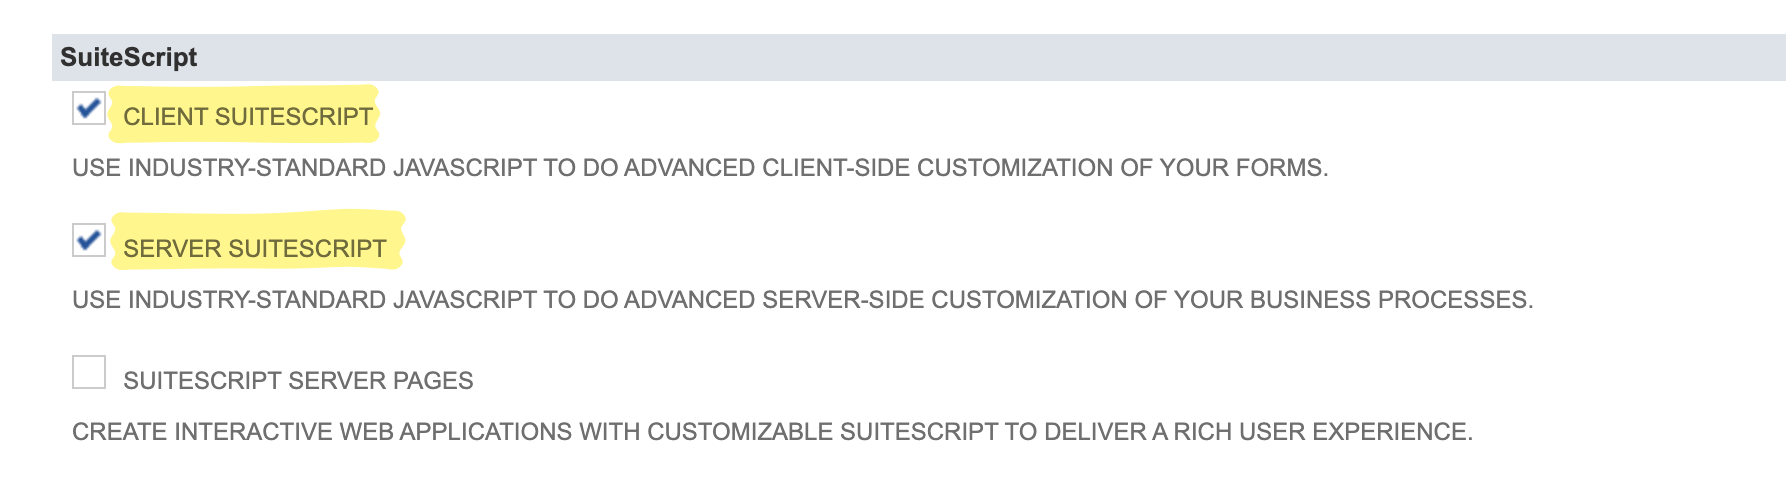
* **Client SuiteScript** - lets client-side scripts run inside NetSuite, required for the connector to interact with the interface.
* **Server SuiteScript** - enables server-side scripting for background processes and API-level operations needed for data exchange.
### Step 2 - Turn on the required features
* **Client SuiteScript** - lets client-side scripts run inside NetSuite, required for the connector to interact with the interface.
* **Server SuiteScript** - enables server-side scripting for background processes and API-level operations needed for data exchange.
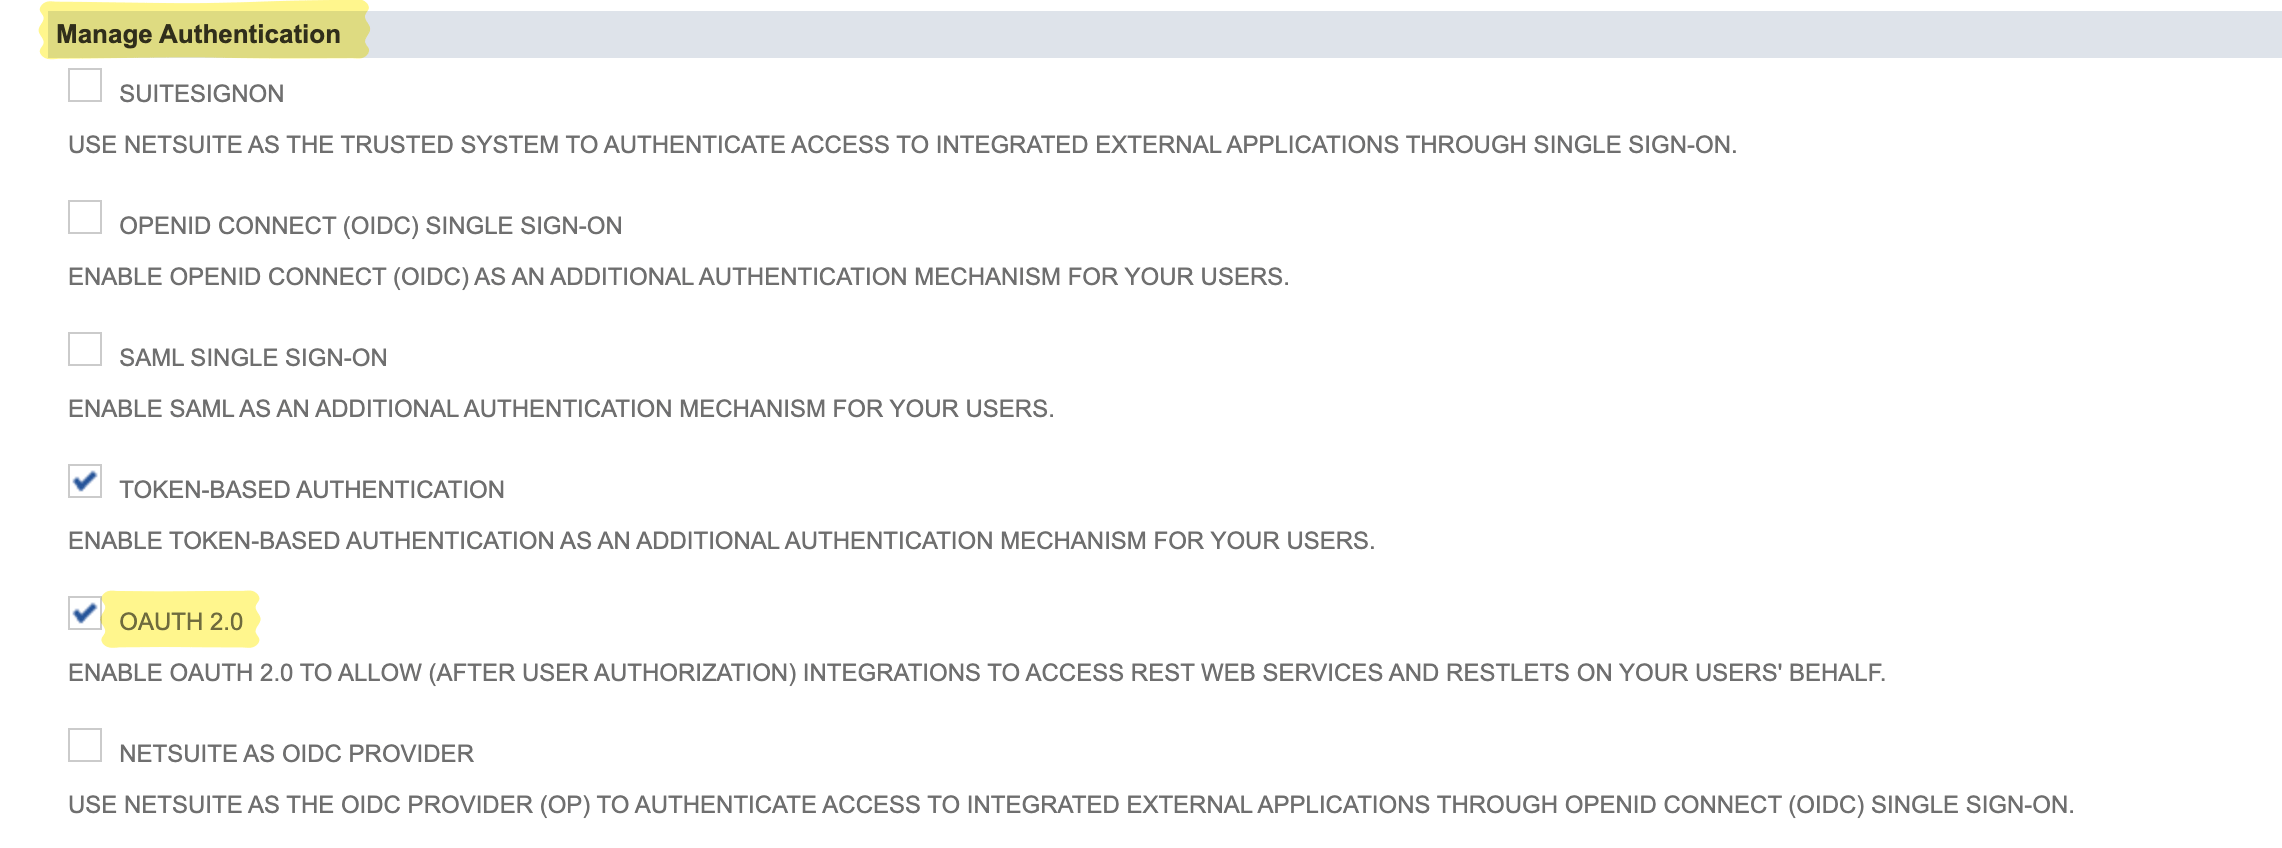
 * **REST Web Services** - activates NetSuite’s REST API, which the connector uses to read from and push data to your NetSuite instance.
 * **OAuth 2.0 (under Manage Authentication)** - token-based authentication so the connector can access your account without exposing your credentials.
 ### Step 3 - Save
Scroll to the bottom of the page and click **Save** to apply the changes.
## 4. Create an integration record (for the Client ID)
Next, create a new integration record in NetSuite. The integration acts as the identity for your connector it’s how NetSuite recognizes and authorizes incoming API requests from aidnn.
### Step 1 - Start a new integration
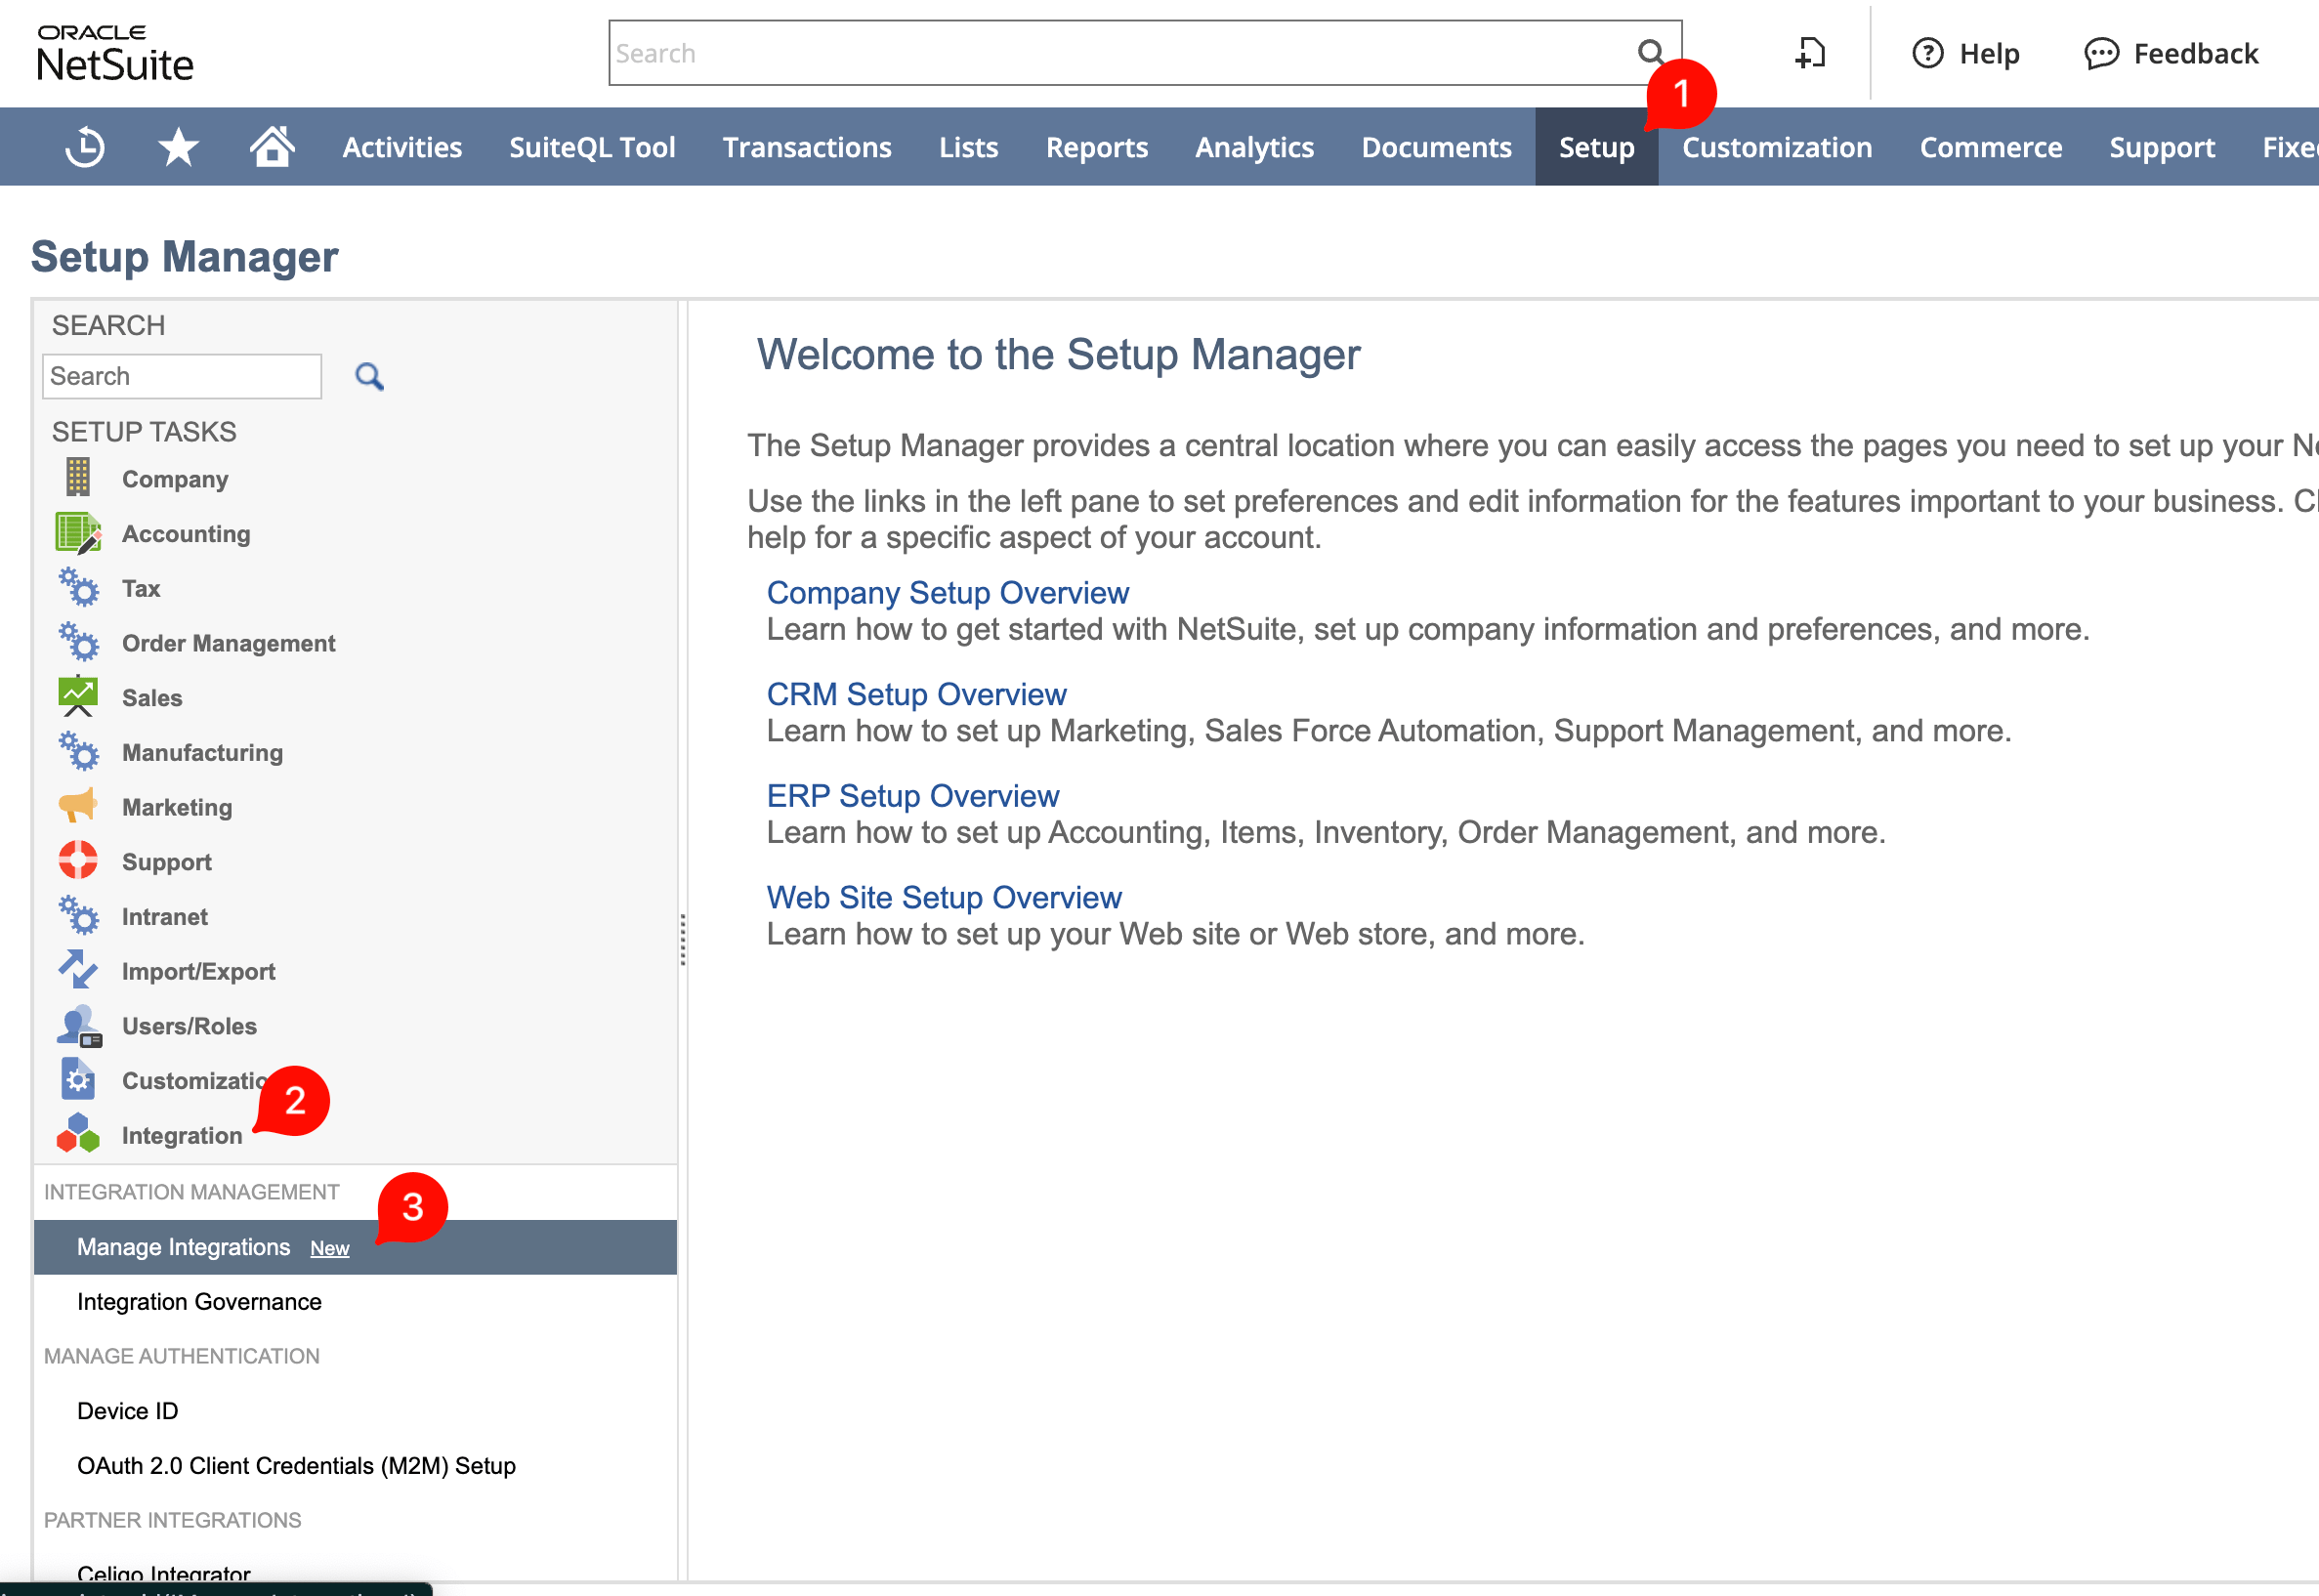
Navigate to **Home › Setup › Integration › Manage Integrations › New**. This opens a form for defining the integration.
### Step 3 - Save
Scroll to the bottom of the page and click **Save** to apply the changes.
## 4. Create an integration record (for the Client ID)
Next, create a new integration record in NetSuite. The integration acts as the identity for your connector it’s how NetSuite recognizes and authorizes incoming API requests from aidnn.
### Step 1 - Start a new integration
Navigate to **Home › Setup › Integration › Manage Integrations › New**. This opens a form for defining the integration.
 ### Step 2 - Configure the integration
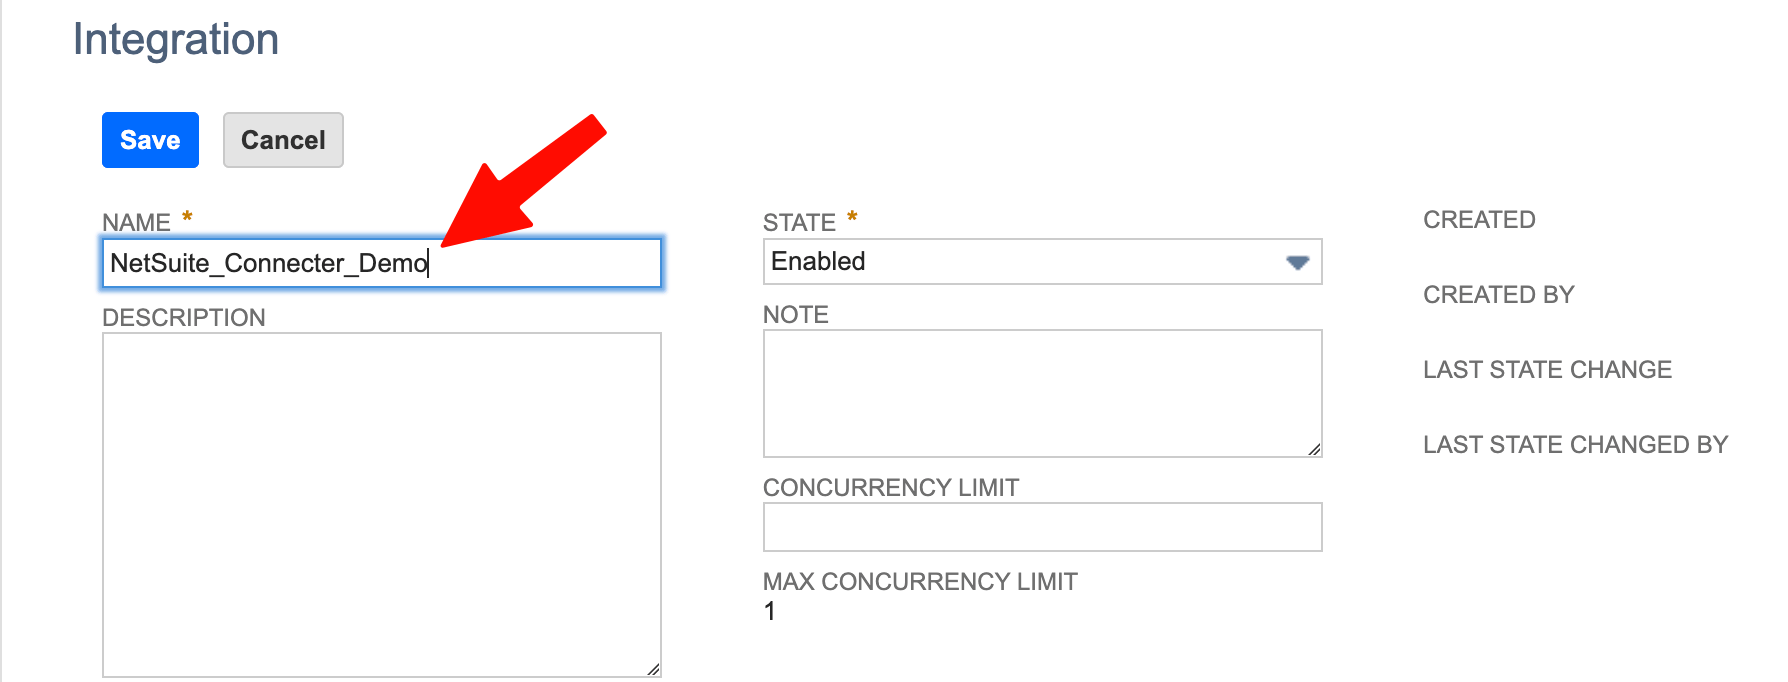
Enter a descriptive name. Set **State** to **Enabled** so the integration can accept and process requests.
### Step 2 - Configure the integration
Enter a descriptive name. Set **State** to **Enabled** so the integration can accept and process requests.
 ### Step 3 - Configure OAuth 2.0
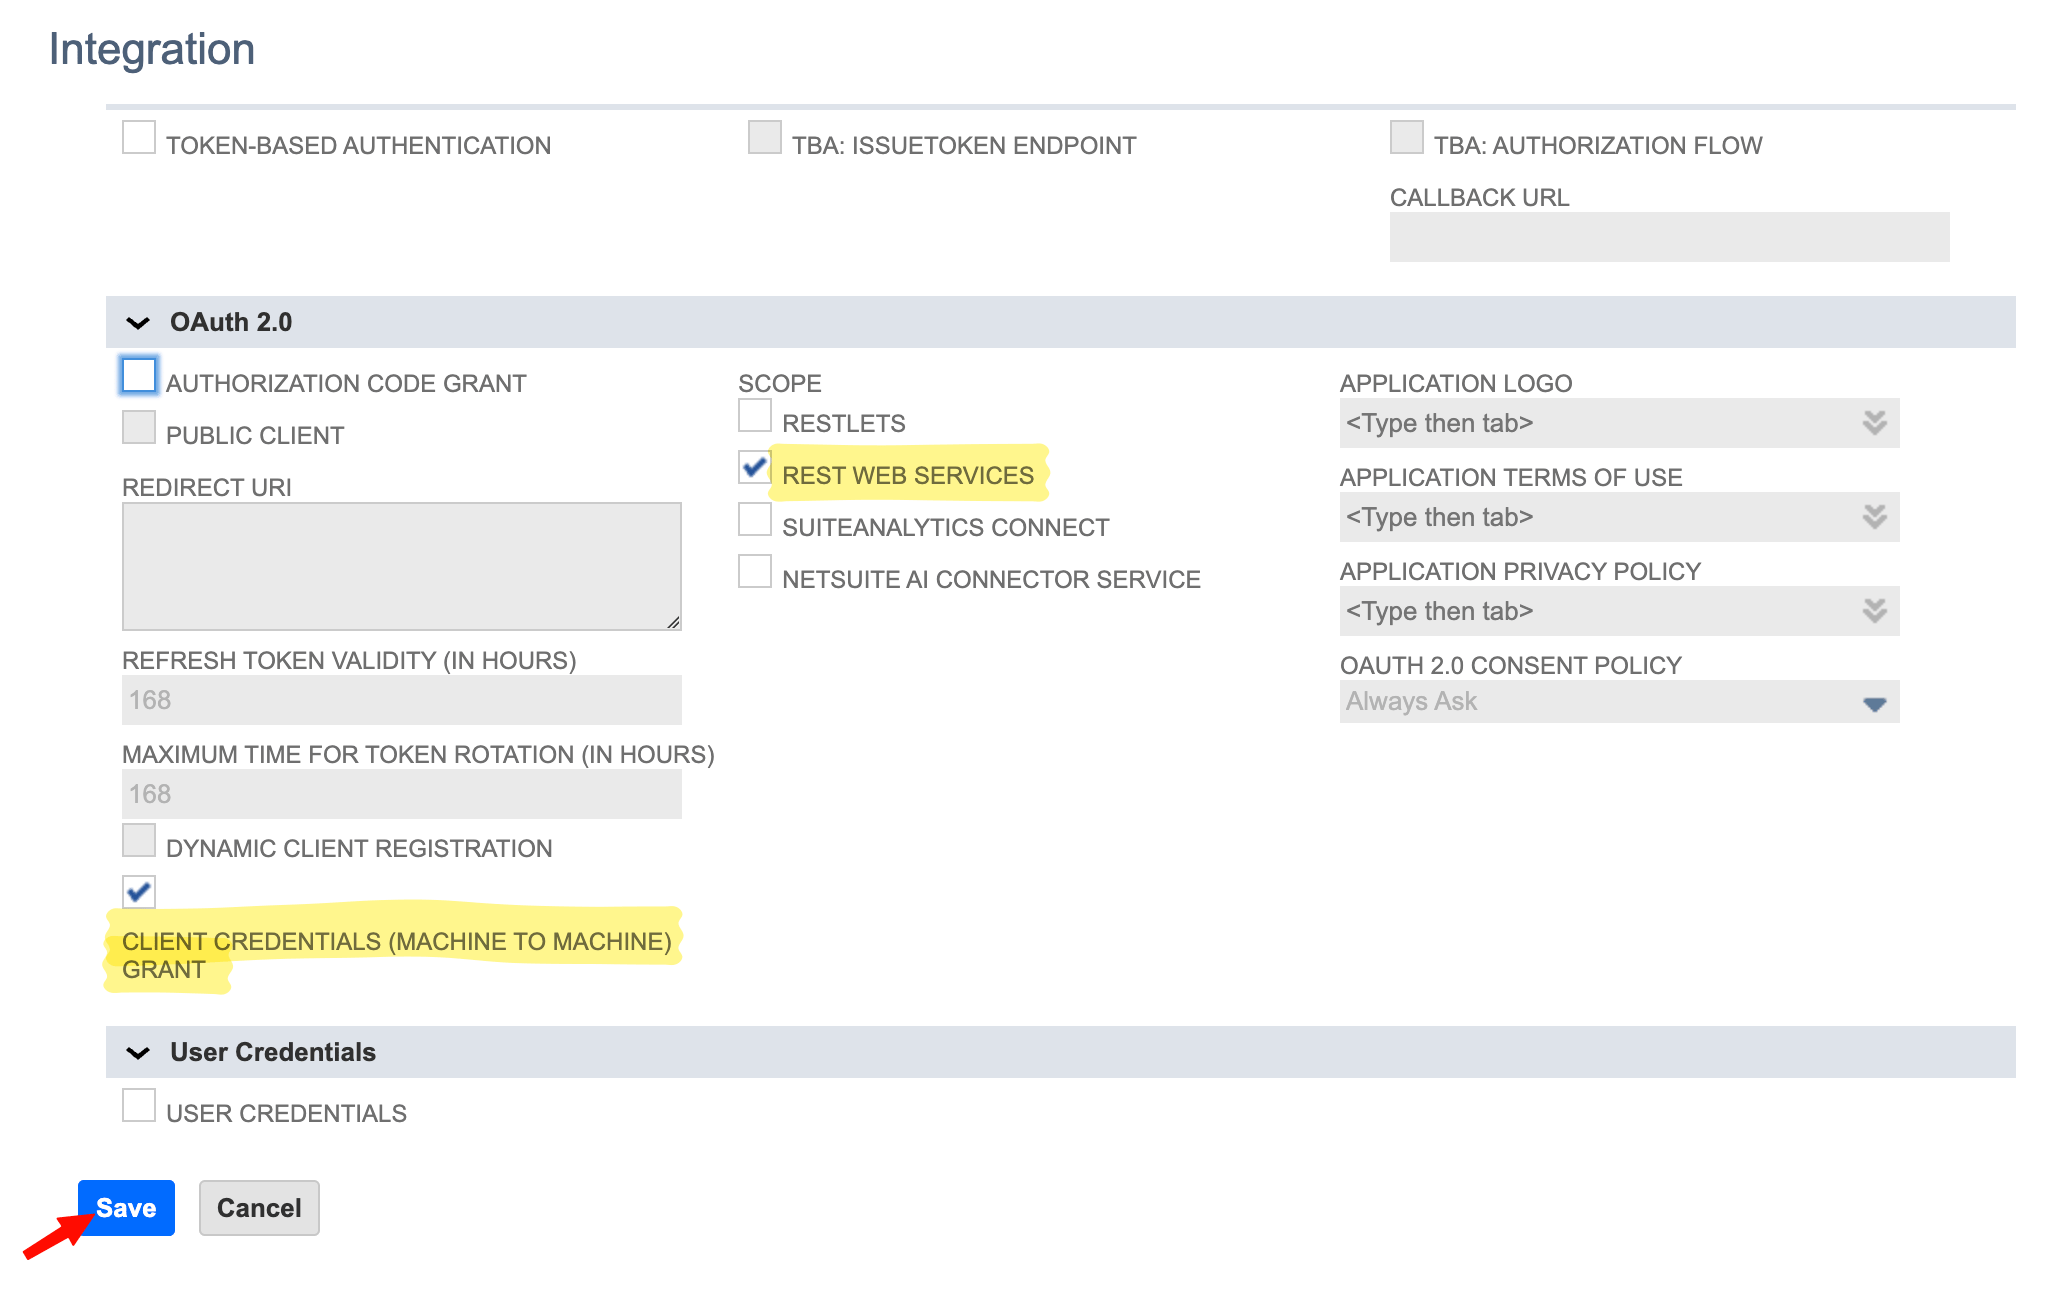
Scroll to the **OAuth 2.0** section and enable both:
• **REST Web Services** - lets the integration call NetSuite via REST, which is how the connector reads and writes data.
• **Client Credentials (Machine to Machine) Grant** - lets the connector authenticate directly with NetSuite using a Client ID and certificate, without requiring a user to log in each time. This is the right flow for automated, server-to-server communication.
### Step 3 - Configure OAuth 2.0
Scroll to the **OAuth 2.0** section and enable both:
• **REST Web Services** - lets the integration call NetSuite via REST, which is how the connector reads and writes data.
• **Client Credentials (Machine to Machine) Grant** - lets the connector authenticate directly with NetSuite using a Client ID and certificate, without requiring a user to log in each time. This is the right flow for automated, server-to-server communication.
 ### Step 4 - Save and copy the Client ID
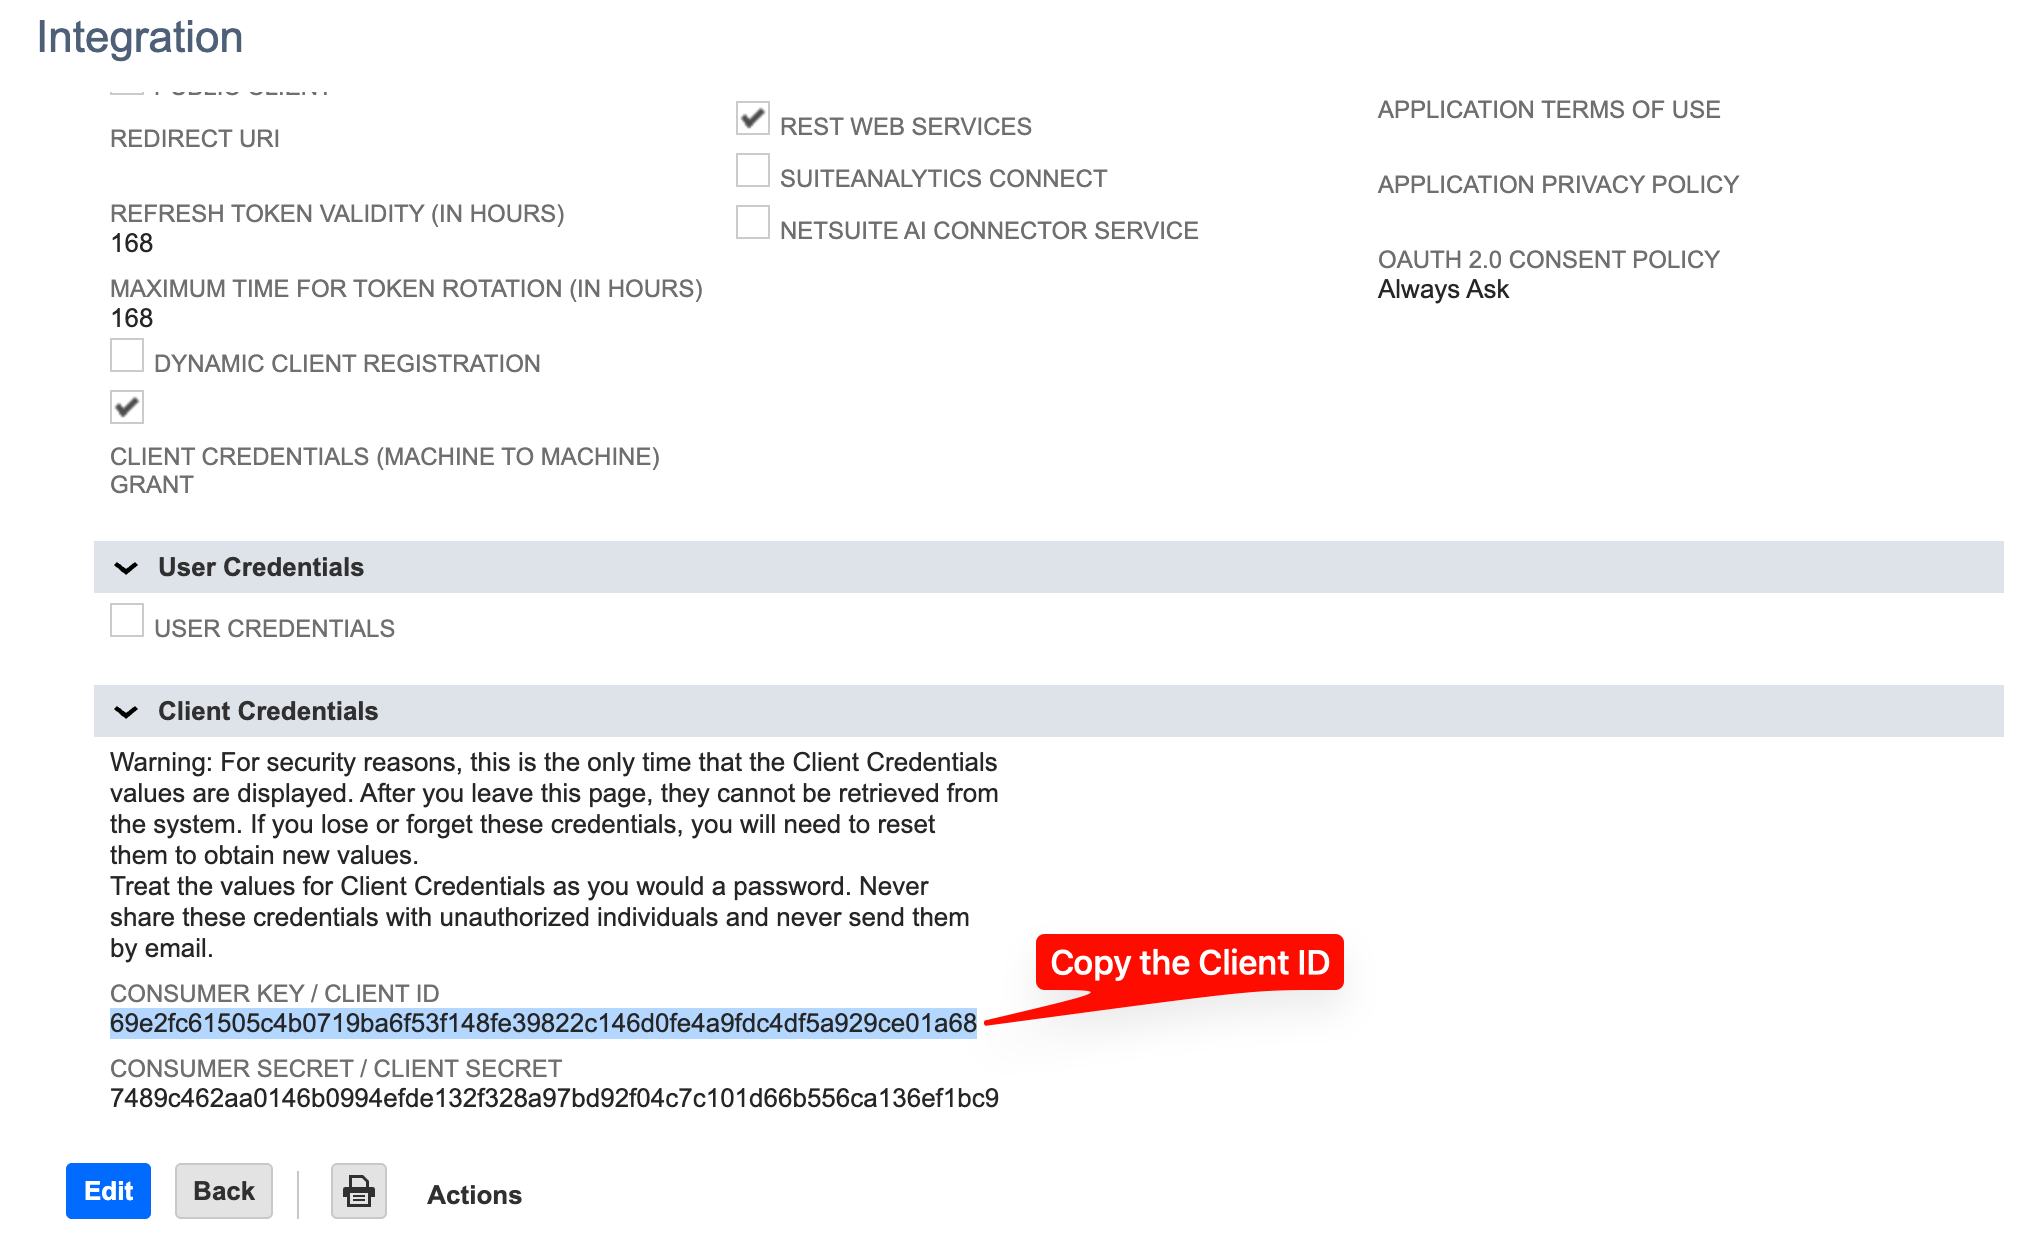
Click **Save**. NetSuite generates a **Client ID**. Copy and securely store the **Client ID** value.
### Step 4 - Save and copy the Client ID
Click **Save**. NetSuite generates a **Client ID**. Copy and securely store the **Client ID** value.
 ### Step 5 - Paste the Client ID into aidnn
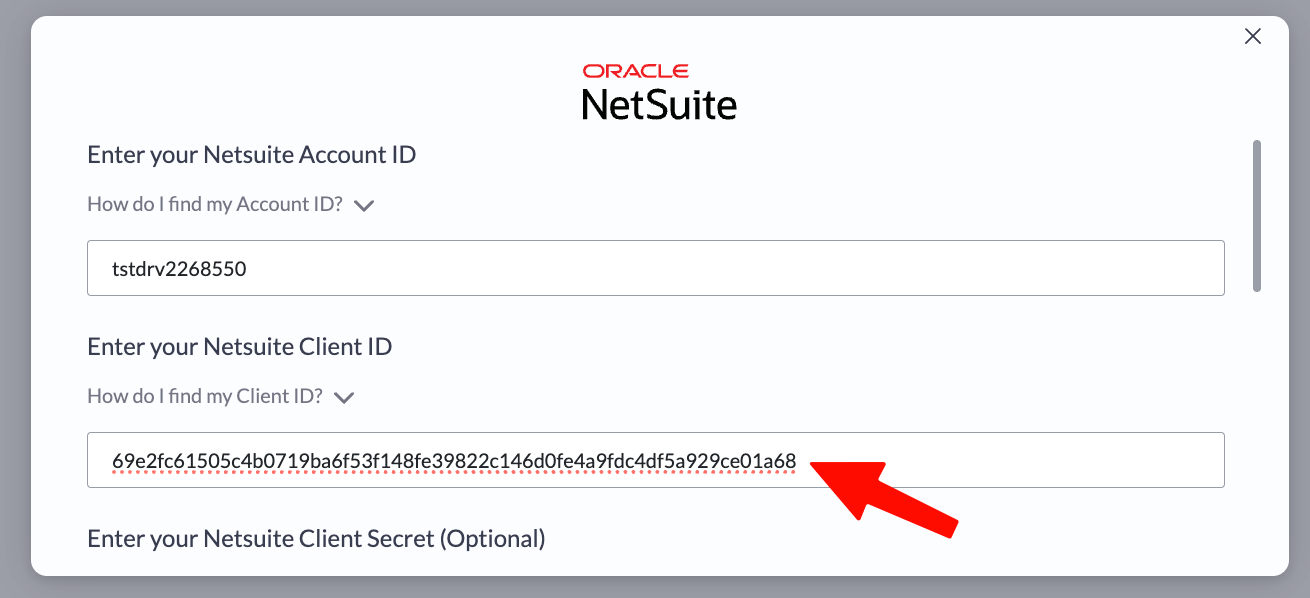
Switch back to the aidnn connector configuration page. Under **NetSuite Client ID**, paste the Client ID and click **Submit** to save the credentials.
### Step 5 - Paste the Client ID into aidnn
Switch back to the aidnn connector configuration page. Under **NetSuite Client ID**, paste the Client ID and click **Submit** to save the credentials.
 ## 5. Generate the Certificate ID
The final piece is a Certificate ID. aidnn uses it to prove its identity to NetSuite on every API call.
### Step 1 - Download the public key from aidnn
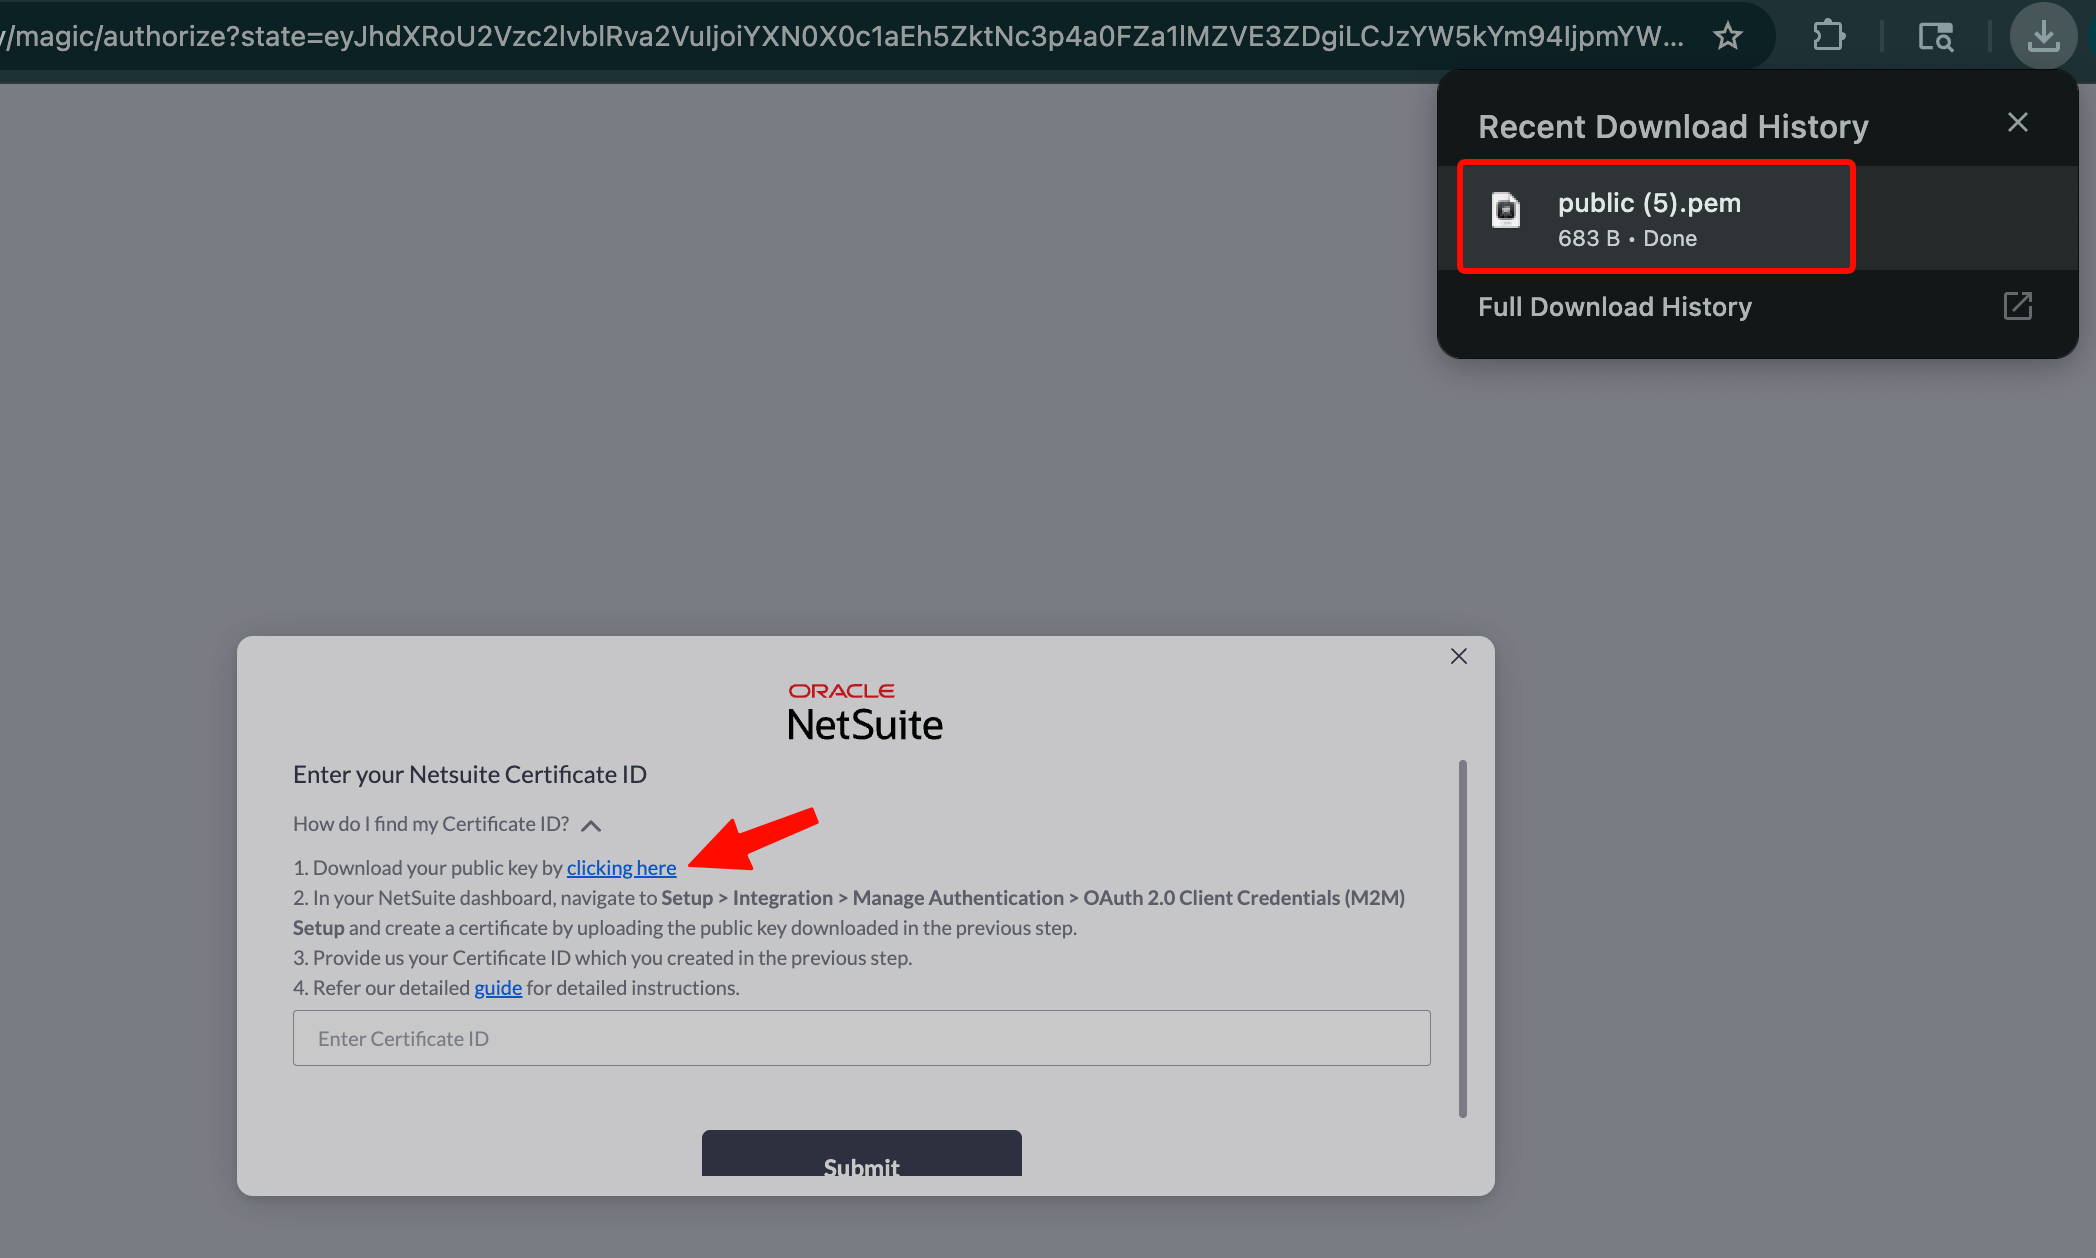
After you submit the Client ID, aidnn shows the Certificate ID screen. Click the dropdown labeled **“How do I find my Certificate ID?”** to reveal a link that downloads the **Public Key**. Save it to your Downloads folder you’ll upload it in NetSuite shortly.
## 5. Generate the Certificate ID
The final piece is a Certificate ID. aidnn uses it to prove its identity to NetSuite on every API call.
### Step 1 - Download the public key from aidnn
After you submit the Client ID, aidnn shows the Certificate ID screen. Click the dropdown labeled **“How do I find my Certificate ID?”** to reveal a link that downloads the **Public Key**. Save it to your Downloads folder you’ll upload it in NetSuite shortly.
 ### Step 2 - Open OAuth 2.0 Client Credentials Setup
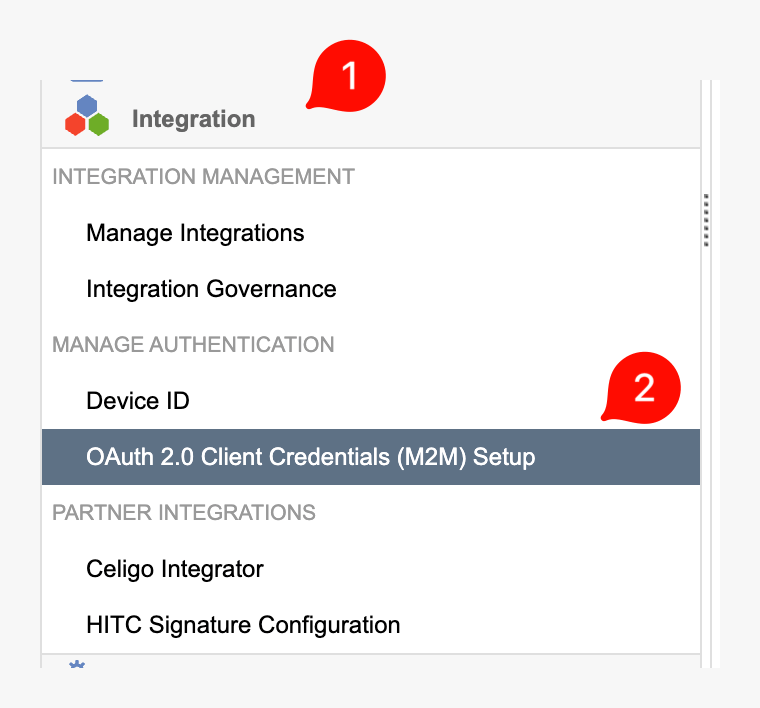
In NetSuite, go to **Setup**, then in the left panel choose **Integration › Manage Authentication › OAuth 2.0 Client Credentials (M2M) Setup**.
### Step 3 - Create a new mapping
Click **Create New**.
### Step 2 - Open OAuth 2.0 Client Credentials Setup
In NetSuite, go to **Setup**, then in the left panel choose **Integration › Manage Authentication › OAuth 2.0 Client Credentials (M2M) Setup**.
### Step 3 - Create a new mapping
Click **Create New**.
 A **Create a New Client Credentials Mapping** pop-up appears. Fill in:
* **Entity** - your administrator user ID in NetSuite (the ID you log in with).
* **Role** - set to Administrator.
* **Application** - select the integration you created in section 4.
* **Certificate** - upload the Public Key file you downloaded in Step 1.
A **Create a New Client Credentials Mapping** pop-up appears. Fill in:
* **Entity** - your administrator user ID in NetSuite (the ID you log in with).
* **Role** - set to Administrator.
* **Application** - select the integration you created in section 4.
* **Certificate** - upload the Public Key file you downloaded in Step 1.
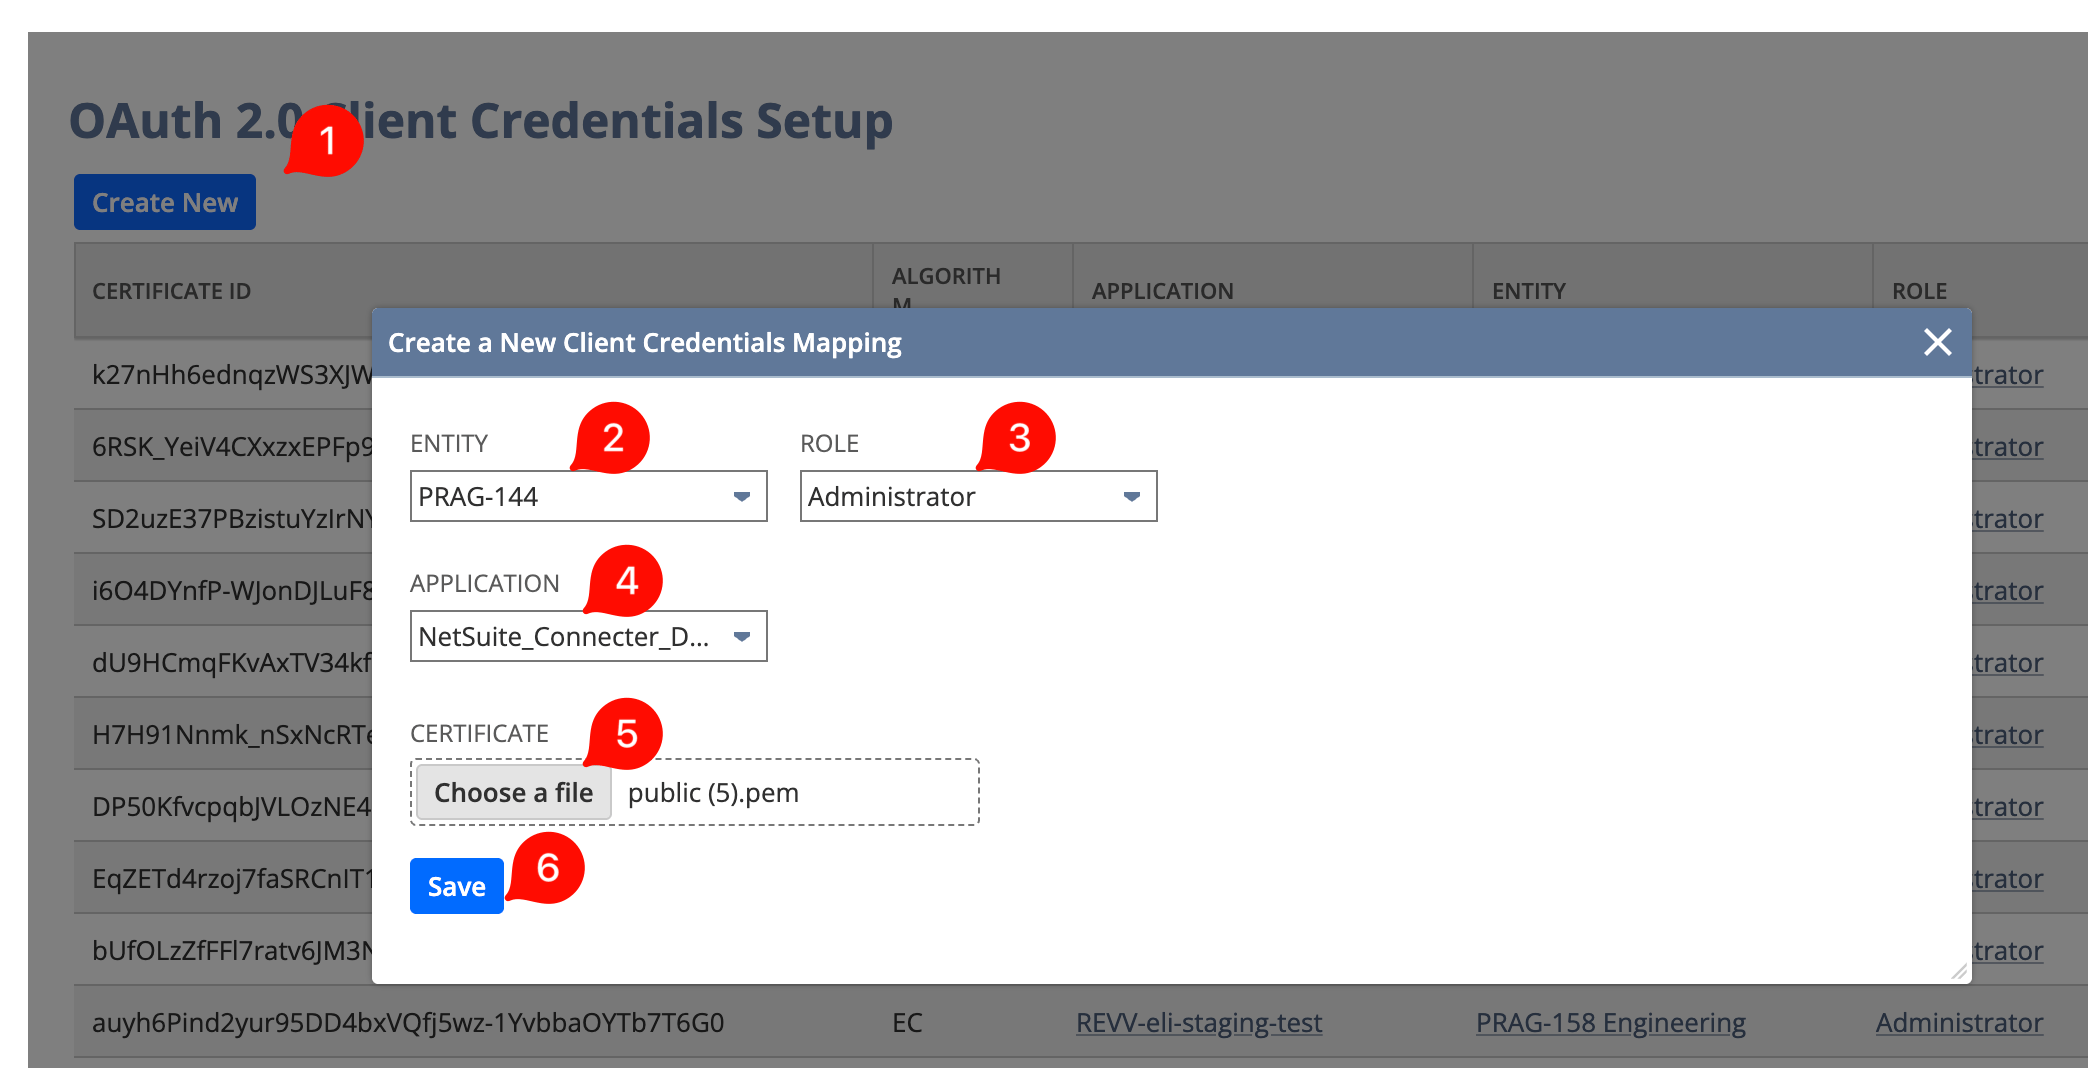 Click **Save** to submit the mapping.
### Step 4 - Copy the Certificate ID
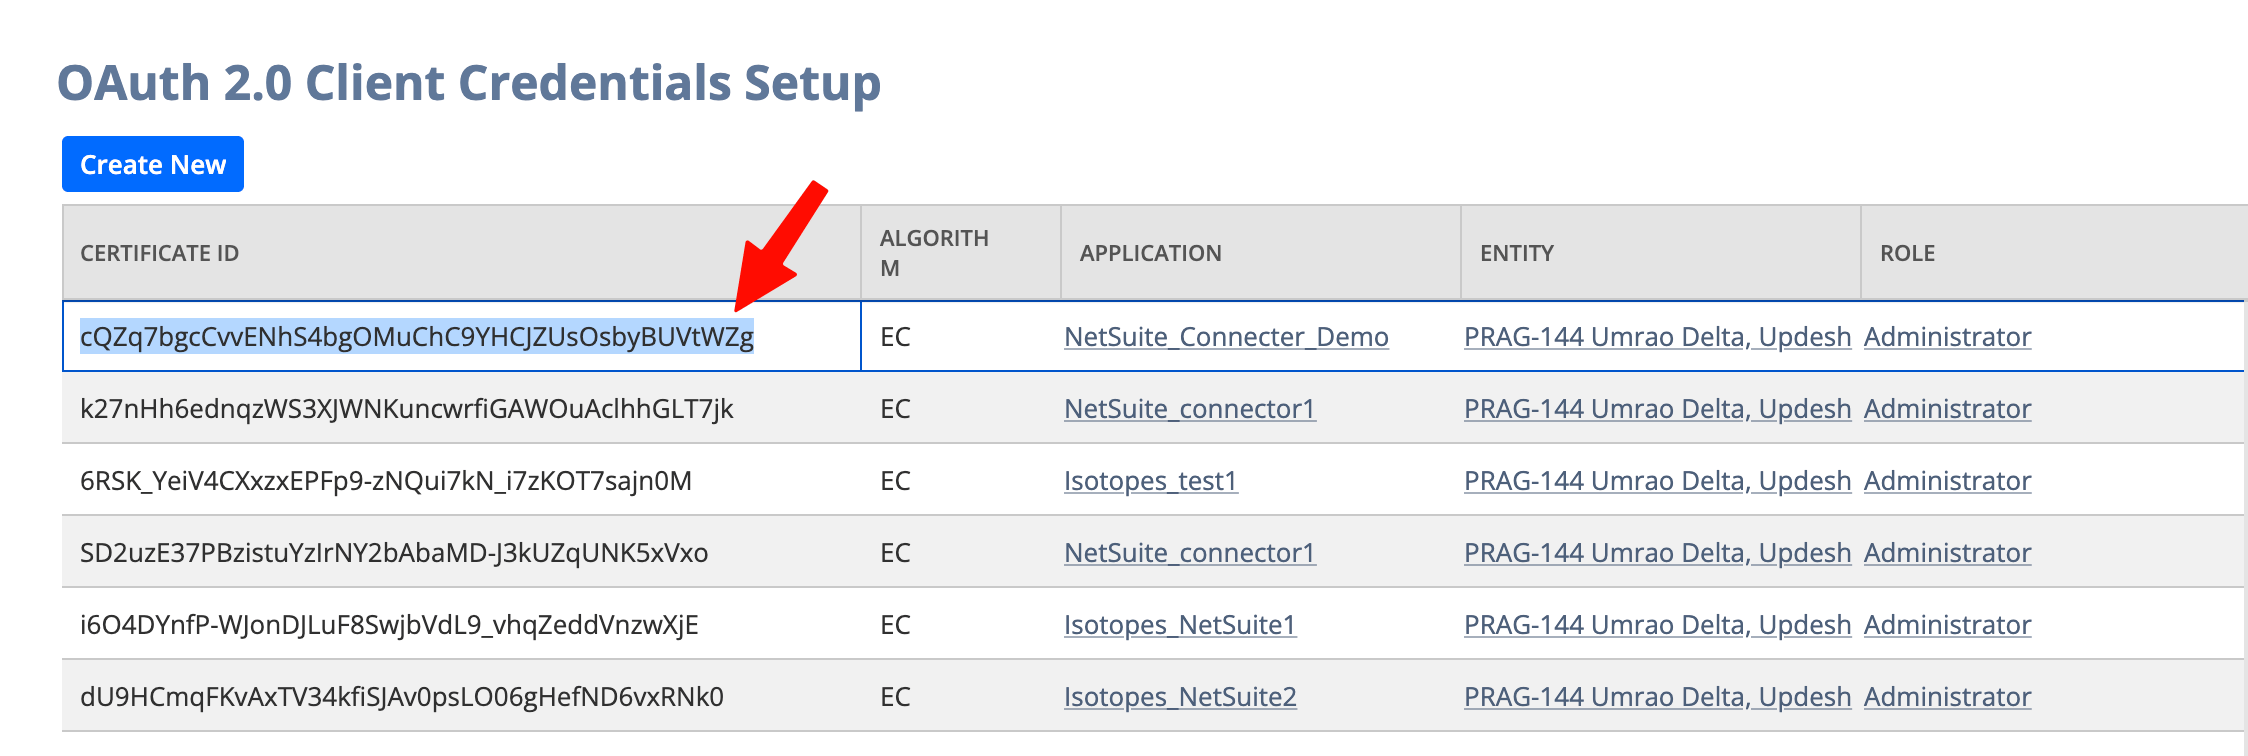
After saving, the page refreshes and your new Certificate ID appears in the list. If you have multiple entries, sort by date of creation to find the most recent one. Copy the Certificate ID.
Click **Save** to submit the mapping.
### Step 4 - Copy the Certificate ID
After saving, the page refreshes and your new Certificate ID appears in the list. If you have multiple entries, sort by date of creation to find the most recent one. Copy the Certificate ID.
 ### Step 5 - Paste the Certificate ID into aidnn
Back in aidnn, paste the Certificate ID into the designated field and click **Submit**.
### Step 5 - Paste the Certificate ID into aidnn
Back in aidnn, paste the Certificate ID into the designated field and click **Submit**.
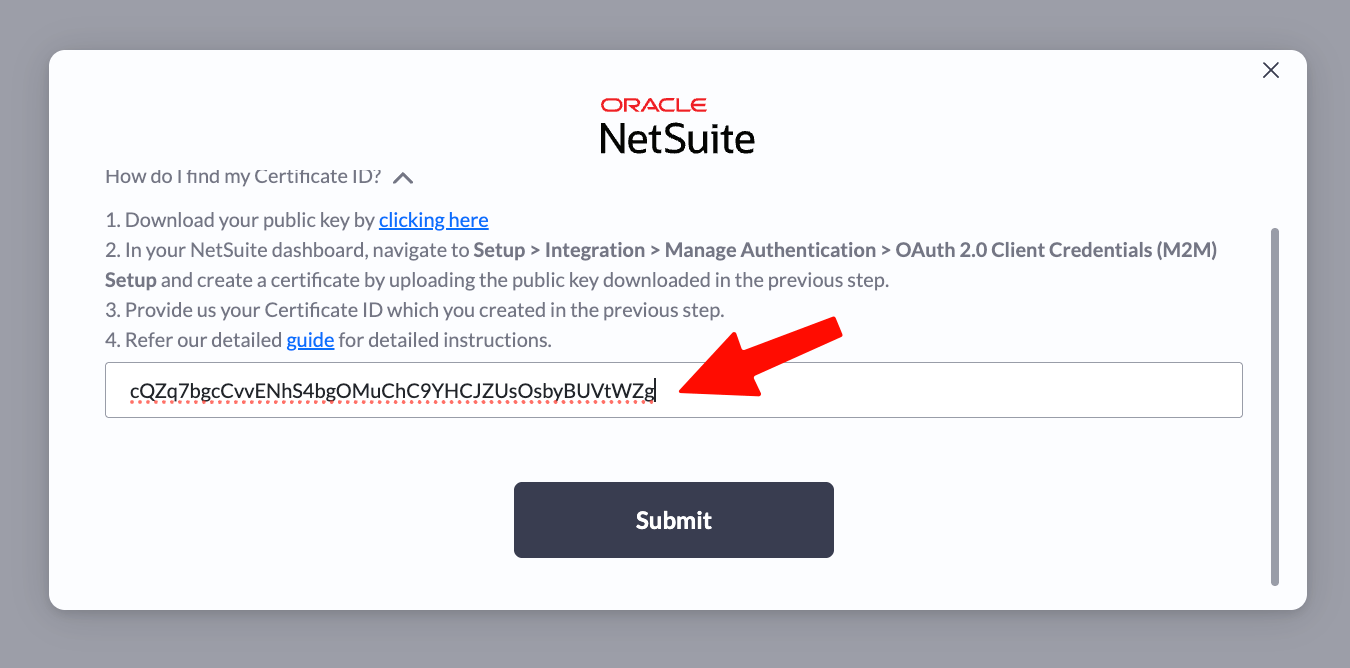 That completes the authentication flow. Your NetSuite connector now appears in your list of available connectors and is ready to use in analyses.