> ## Documentation Index
> Fetch the complete documentation index at: https://docs.isotopes.ai/llms.txt
> Use this file to discover all available pages before exploring further.
# Snowflake Connector
## Overview
Connecting Snowflake to aidnn lets you analyze warehouse data live alongside the rest of your sources. Setup runs in two parts: first your Snowflake admin provisions a dedicated read-only role, service user and Personal Access Token (PAT) in Snowflake, then you enter those credentials in aidnn and pick which databases to sync.
## 1. Prerequisites - Snowflake admin setup
This section runs entirely in Snowflake. It uses a fictitious organization “AcmeCorp” with database ACMECORP\_PROD and warehouse ANALYSIS\_WH substitute your own names. You’ll need a Snowflake role with permissions to create roles, users, grants, and PATs (typically ACCOUNTADMIN or an equivalent admin role).
### Create the read-only role and grant database access
Create a dedicated read-only role and grant USAGE/SELECT on existing and future objects in the database, so the role keeps working as the schema evolves.
```sql theme={null}
-- Optional: Check if grants already exist for the role
SHOW GRANTS ON ROLE AIDNN_READONLY_ROLE;
-- Create the dedicated read-only role
CREATE ROLE AIDNN_READONLY_ROLE;
-- Grant USAGE on the ACMECORP_PROD database
GRANT USAGE ON DATABASE ACMECORP_PROD TO ROLE AIDNN_READONLY_ROLE;
-- Grant USAGE on all existing schemas in the ACMECORP_PROD database
GRANT USAGE ON ALL SCHEMAS IN DATABASE ACMECORP_PROD TO ROLE AIDNN_READONLY_ROLE;
-- Grant SELECT on all existing tables in the ACMECORP_PROD database
GRANT SELECT ON ALL TABLES IN DATABASE ACMECORP_PROD
TO ROLE AIDNN_READONLY_ROLE;
-- Grant SELECT on all existing views in the ACMECORP_PROD database
GRANT SELECT ON ALL VIEWS IN DATABASE ACMECORP_PROD
TO ROLE AIDNN_READONLY_ROLE;
-- Grant USAGE on FUTURE schemas created in the ACMECORP_PROD database
GRANT USAGE ON FUTURE SCHEMAS IN DATABASE ACMECORP_PROD
TO ROLE AIDNN_READONLY_ROLE;
-- Grant SELECT on FUTURE tables created in the ACMECORP_PROD database
GRANT SELECT ON FUTURE TABLES IN DATABASE ACMECORP_PROD
TO ROLE AIDNN_READONLY_ROLE;
-- Grant SELECT on FUTURE views created in the ACMECORP_PROD database
GRANT SELECT ON FUTURE VIEWS IN DATABASE ACMECORP_PROD
TO ROLE AIDNN_READONLY_ROLE;
```
## Create the service user
Create a service account user that aidnn will authenticate as.
```sql theme={null}
CREATE USER AIDNN_SERVICE_USER
PASSWORD = 'StrongPassword123!';
```
Attach a network policy so this user can accept connections from aidnn:
```sql theme={null}
ALTER USER AIDNN_SERVICE_USER SET NETWORK_POLICY = 'ALLOW_ALL_POLICY';
```
## Grant the role to the user and grant warehouse access
Assign the read-only role to the service user, and grant USAGE on the warehouse the role will run queries against.
```sql theme={null}
-- Grant the role to the service user
GRANT ROLE AIDNN_READONLY_ROLE TO USER AIDNN_SERVICE_USER;
-- Grant USAGE on the analysis warehouse to the read-only role
GRANT USAGE ON WAREHOUSE ANALYSIS_WH TO ROLE AIDNN_READONLY_ROLE;
```
### Create the Personal Access Token (PAT)
aidnn authenticates with a PAT scoped to AIDNN\_SERVICE\_USER and AIDNN\_READONLY\_ROLE. You can create it through the Snowflake UI or with SQL:
```sql theme={null}
ALTER USER AIDNN_SERVICE_USER ADD PAT aidnn_readonly_pat
ROLE_RESTRICTION = 'AIDNN_READONLY_ROLE'
DAYS_TO_EXPIRY = 30
COMMENT = 'PAT for readonly access for Aidnn service user';
```
## 2. Add the Snowflake connector in aidnn
### Open the Connectors page
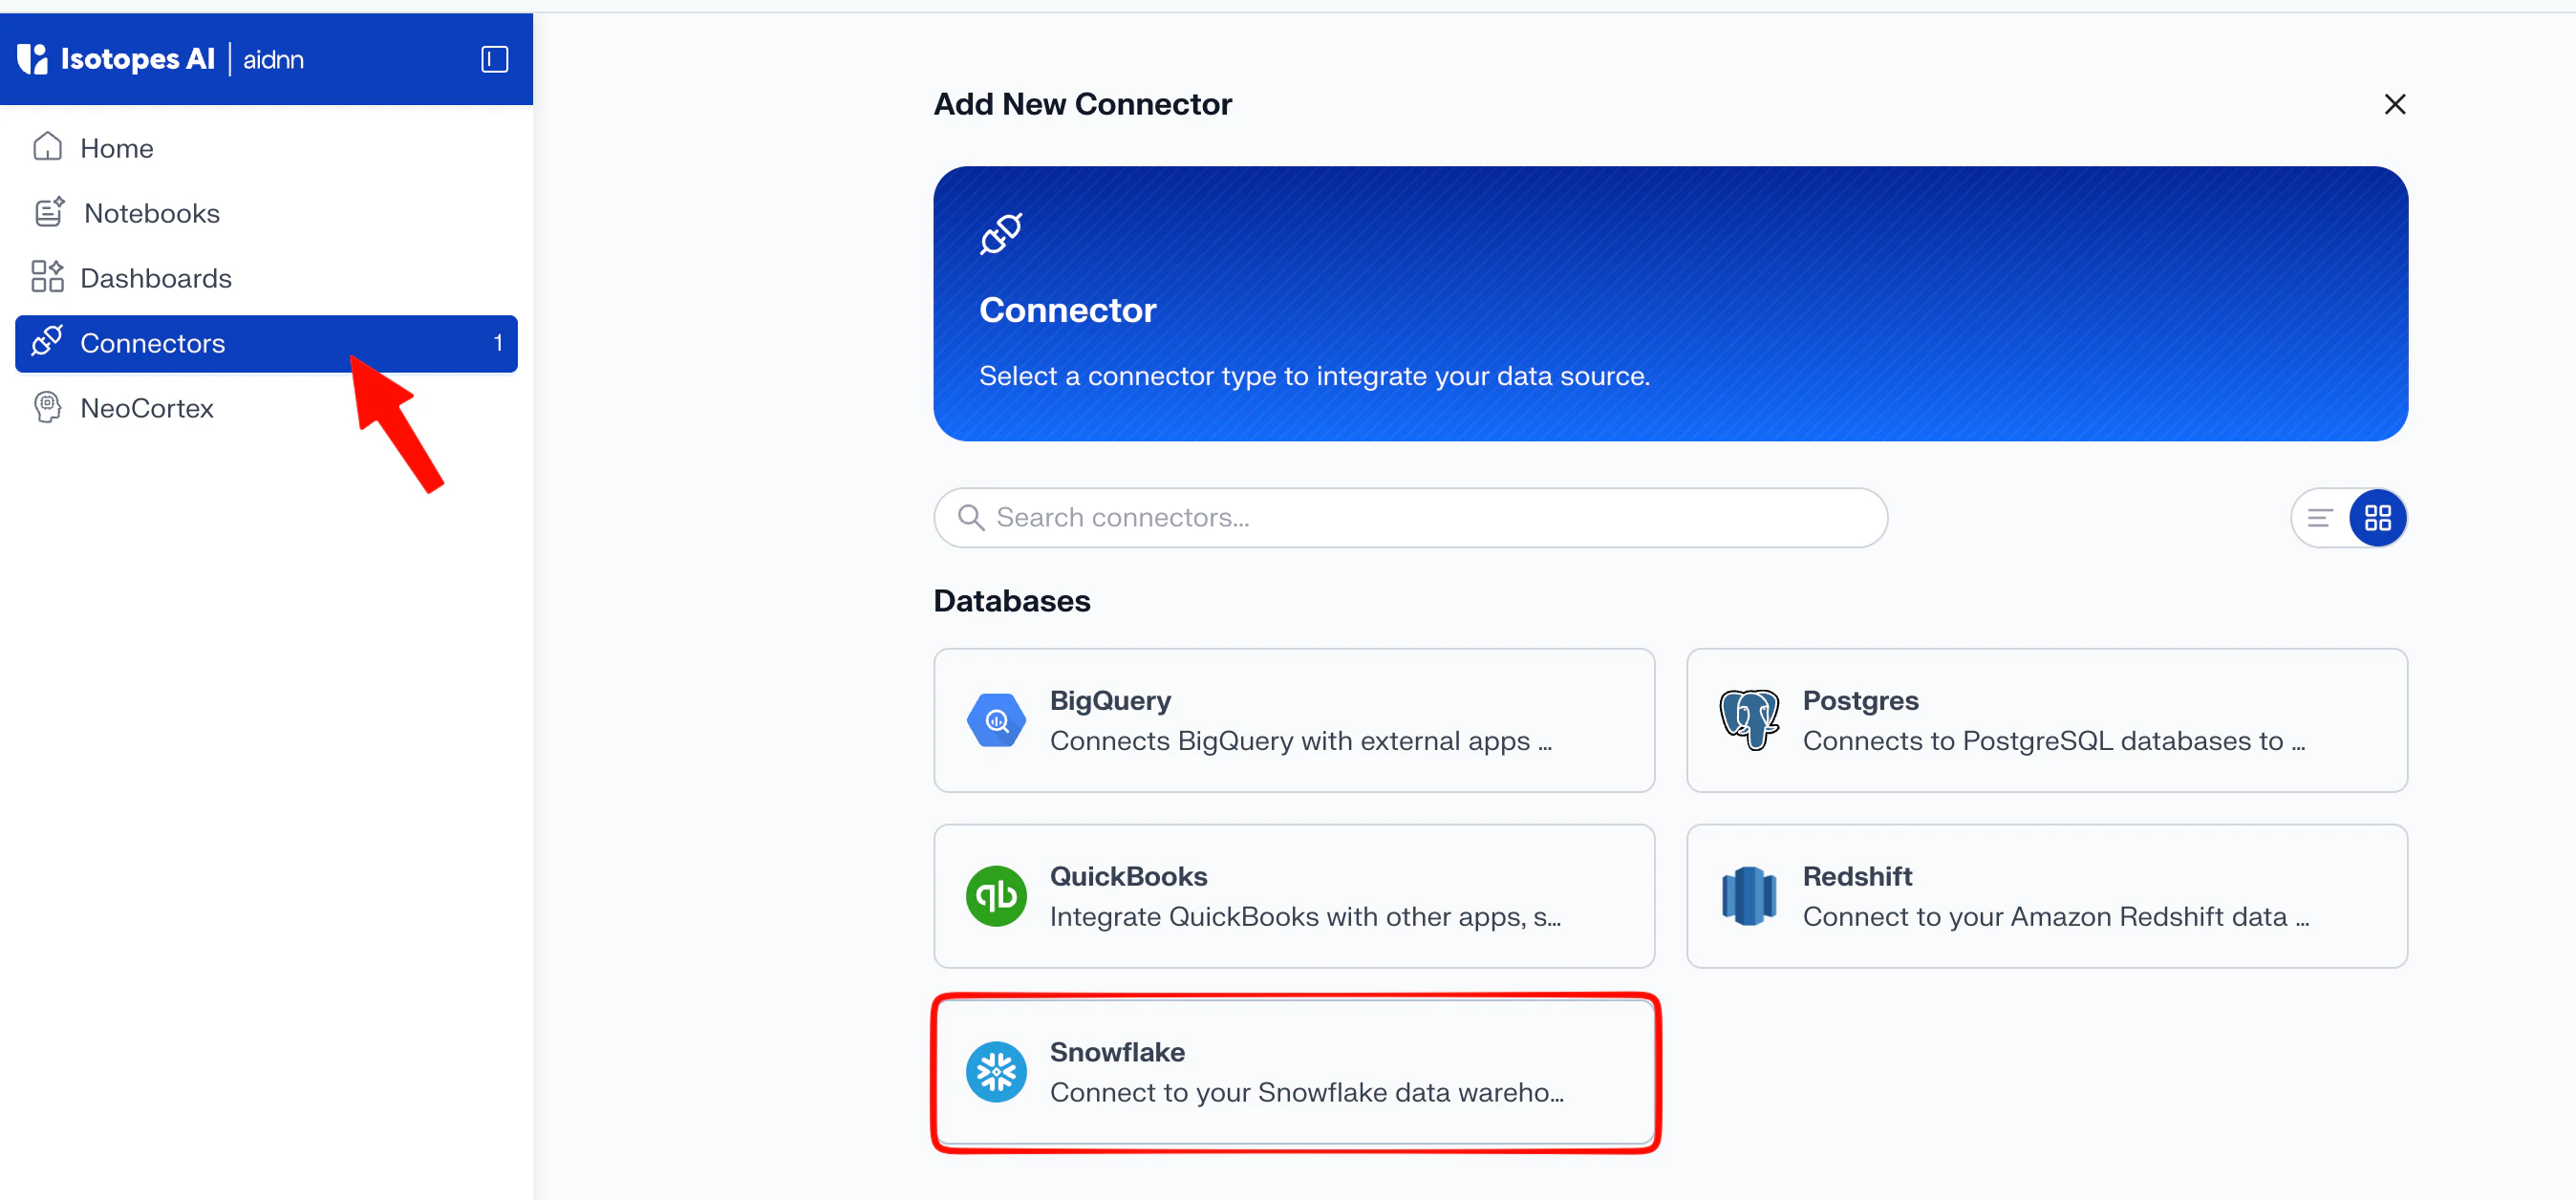
From the aidnn home screen, click **Connectors** in the left sidebar.
 ### Start a new connector
Click **Add New Connector** in the top-right corner. You’ll see a grid of every available connector grouped by category.
### Pick Snowflake
Under **Databases**, choose **Snowflake**. This opens the **Add New Snowflake Service** page.
## 3. Fill in the connector details
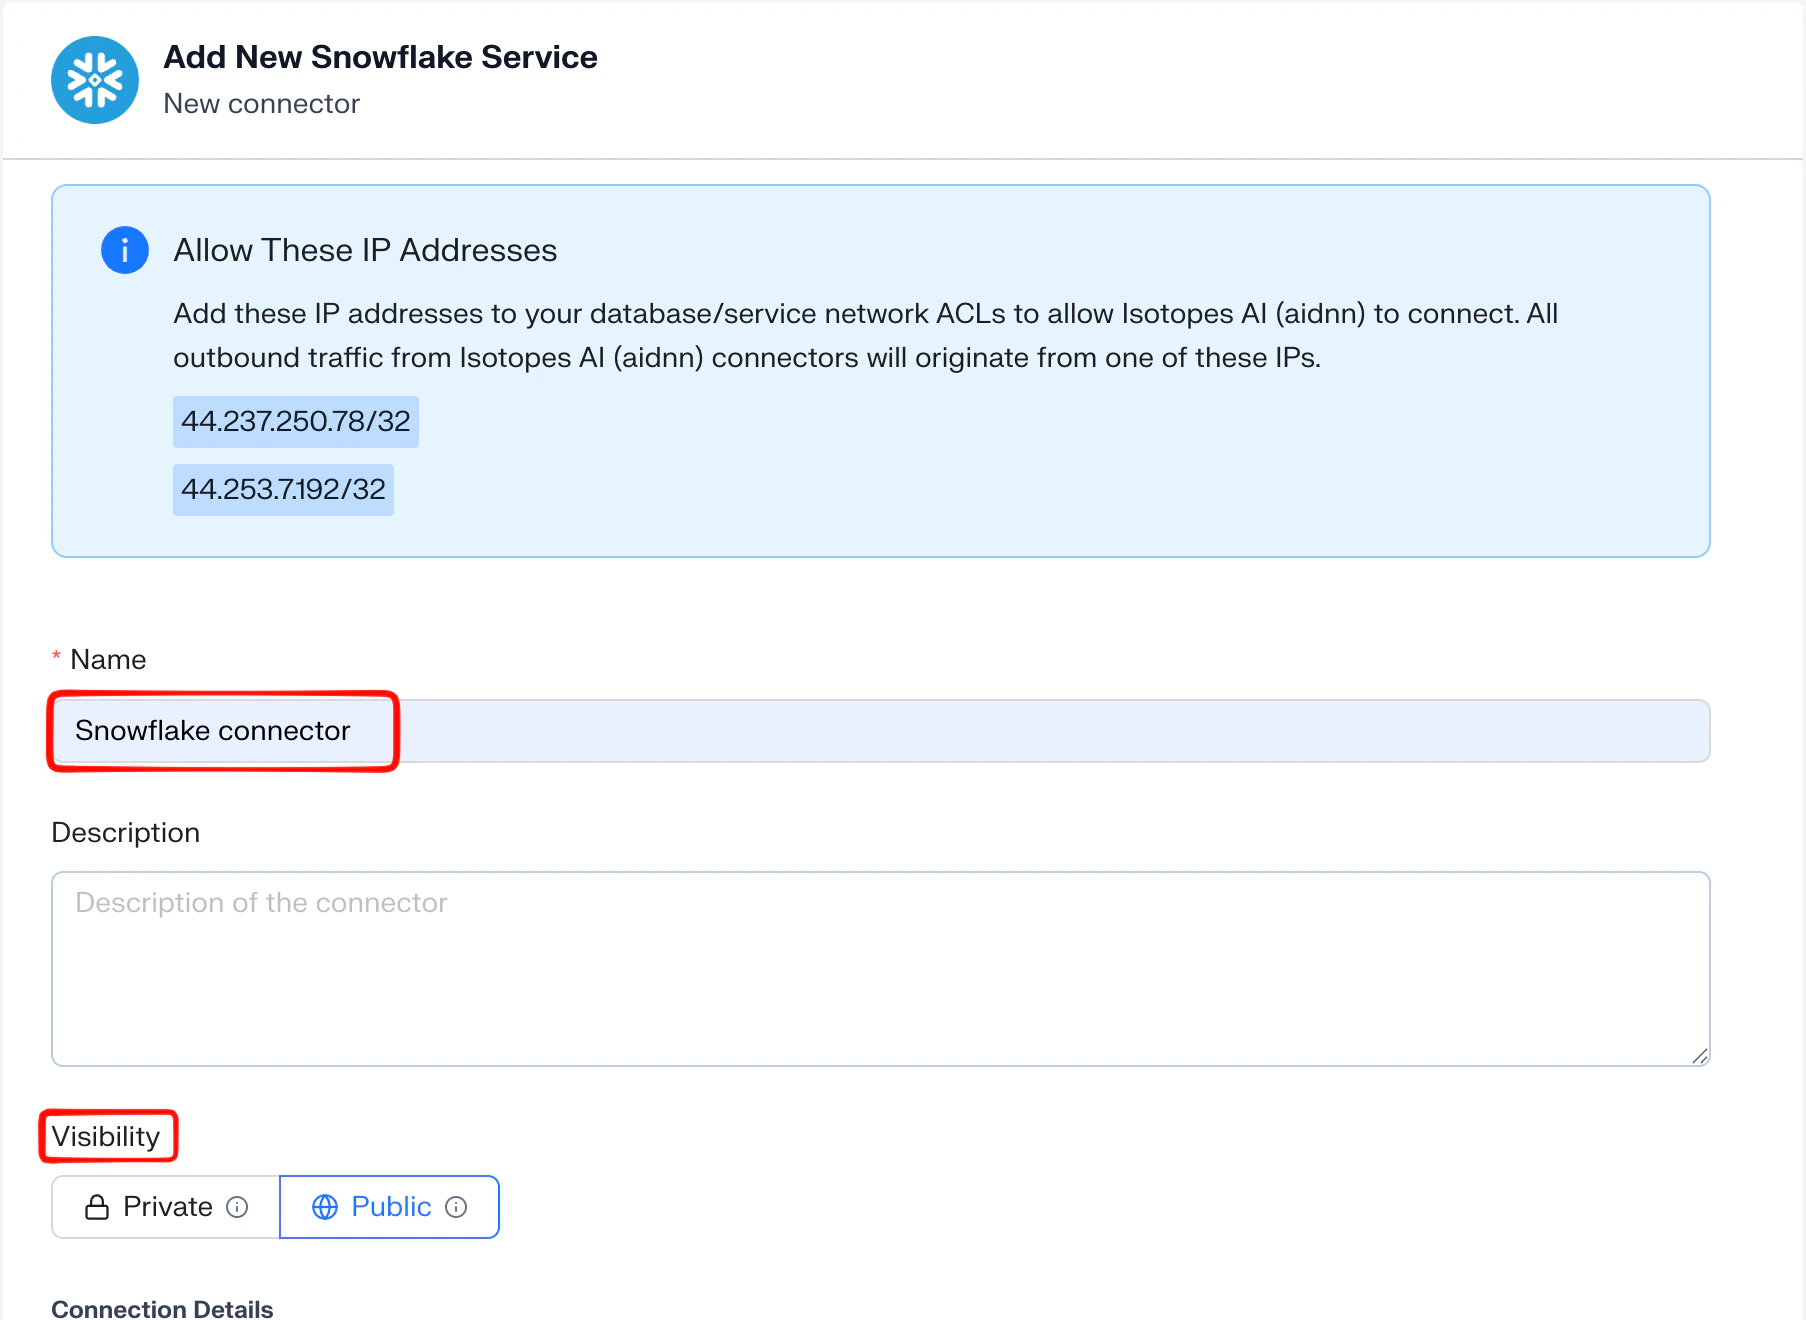
The Add New Snowflake Service form has two parts: identification (name, description) and credential configuration.
### General fields
* **Name** - Any descriptive name, this is what shows up as the connector name once setup is complete (for example, “Snowflake – ACMECORP\_PROD”).
* **Description** - Useful when you connect more than one Snowflake account or warehouse.
### Start a new connector
Click **Add New Connector** in the top-right corner. You’ll see a grid of every available connector grouped by category.
### Pick Snowflake
Under **Databases**, choose **Snowflake**. This opens the **Add New Snowflake Service** page.
## 3. Fill in the connector details
The Add New Snowflake Service form has two parts: identification (name, description) and credential configuration.
### General fields
* **Name** - Any descriptive name, this is what shows up as the connector name once setup is complete (for example, “Snowflake – ACMECORP\_PROD”).
* **Description** - Useful when you connect more than one Snowflake account or warehouse.
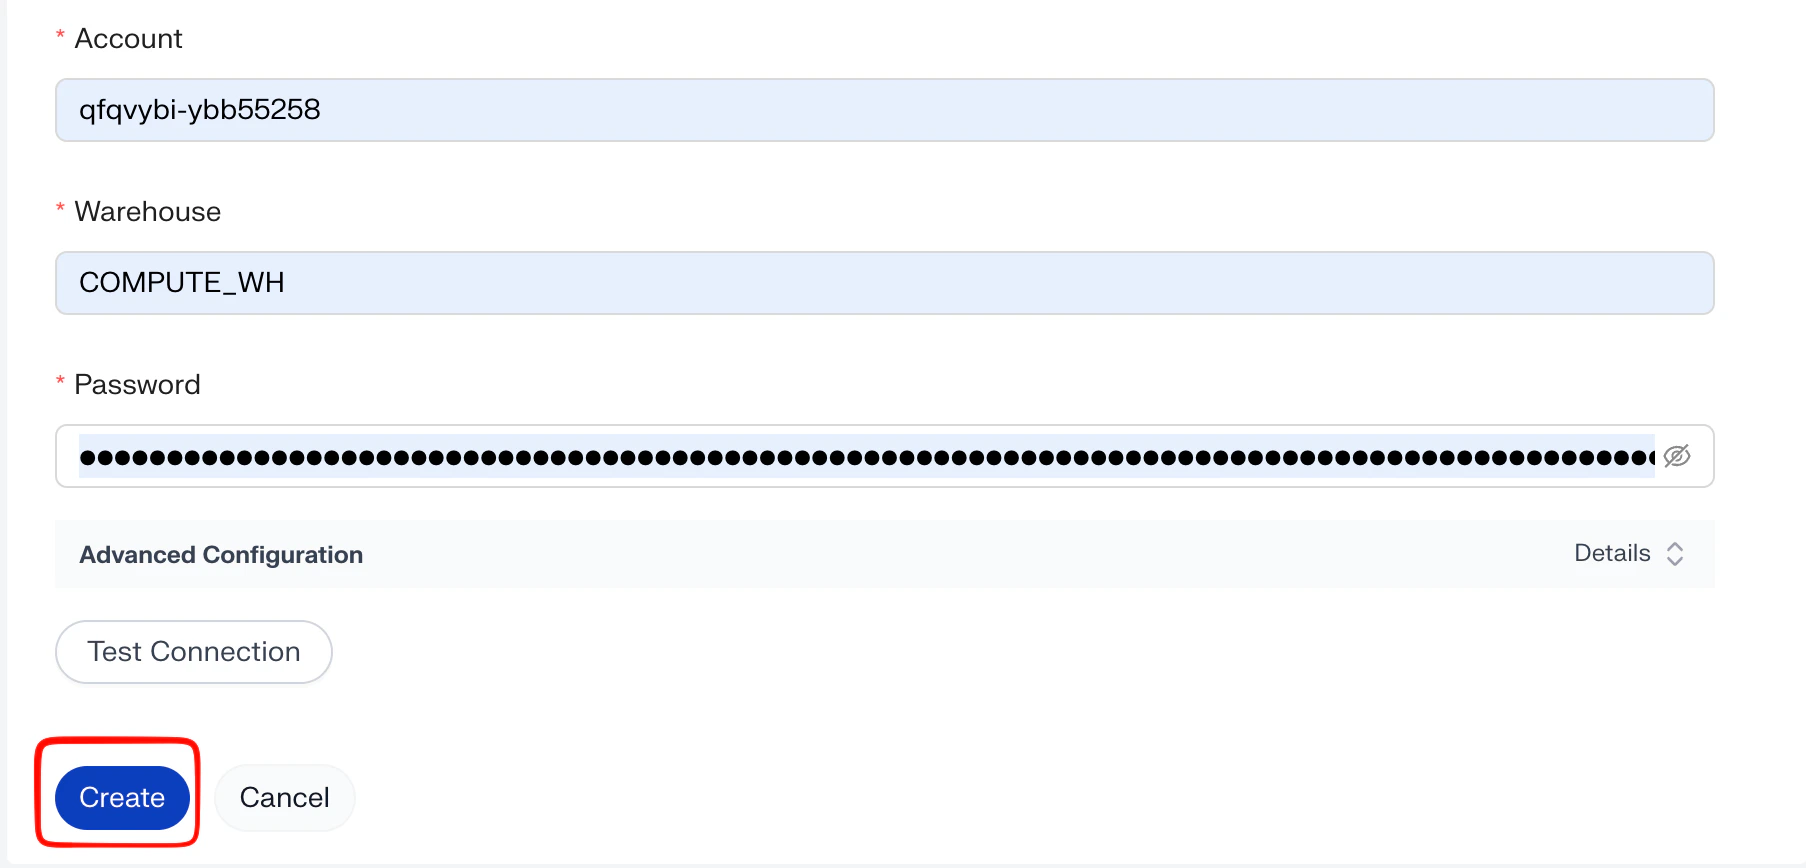
 ### Credential configuration
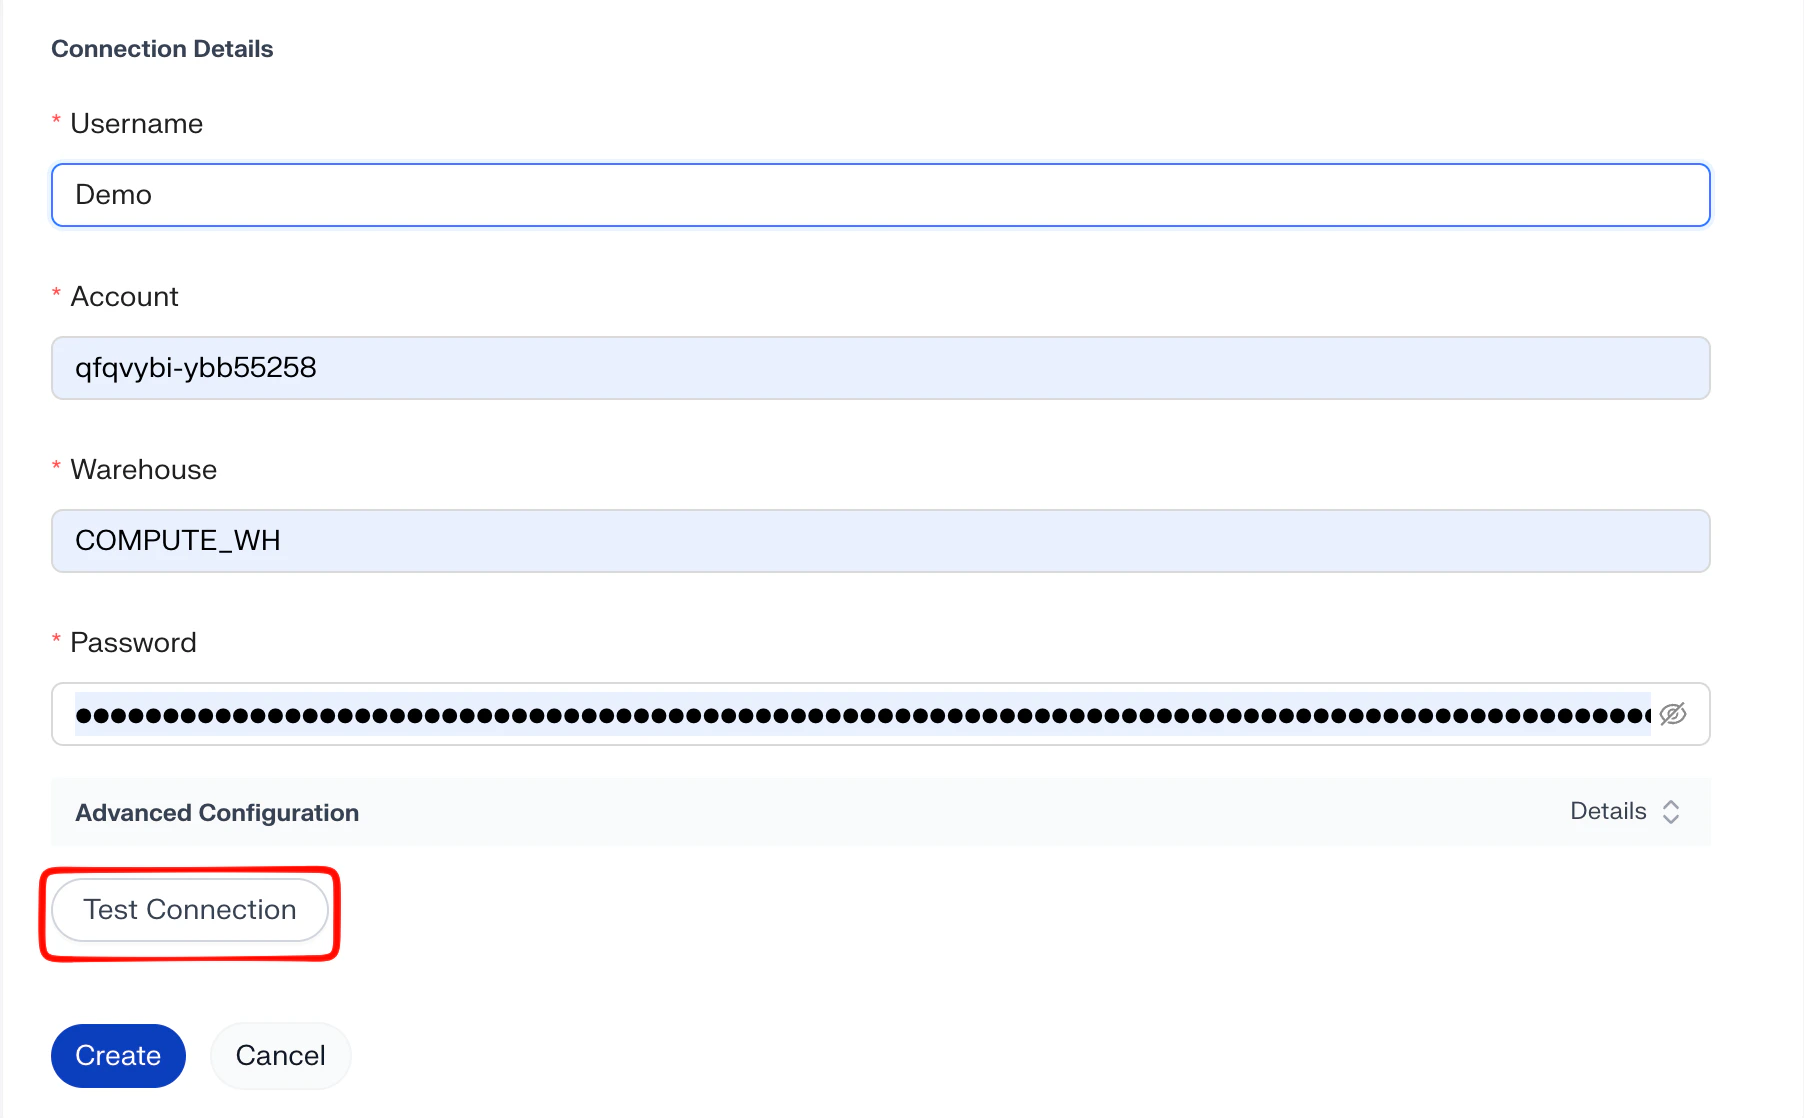
* **Username** - the Snowflake user aidnn authenticates as (the AIDNN\_SERVICE\_USER you created in section 1).
* **Account** - your Snowflake account identifier (for example, [xy12345.us](http://xy12345.us)-east-1). This identifies the Snowflake account aidnn connects to.
* **Warehouse** - the virtual warehouse aidnn runs queries against (for example, ANALYSIS\_WH).
* **Password** - paste the Personal Access Token (PAT) here, not the user’s Snowflake login password.
* **Advanced Configuration Options** - optional, typically not needed unless your username and PAT are scoped to a specific role or default database. If they are, ask your Snowflake admin for those values.
### Credential configuration
* **Username** - the Snowflake user aidnn authenticates as (the AIDNN\_SERVICE\_USER you created in section 1).
* **Account** - your Snowflake account identifier (for example, [xy12345.us](http://xy12345.us)-east-1). This identifies the Snowflake account aidnn connects to.
* **Warehouse** - the virtual warehouse aidnn runs queries against (for example, ANALYSIS\_WH).
* **Password** - paste the Personal Access Token (PAT) here, not the user’s Snowflake login password.
* **Advanced Configuration Options** - optional, typically not needed unless your username and PAT are scoped to a specific role or default database. If they are, ask your Snowflake admin for those values.
 ## 4. Test the connection
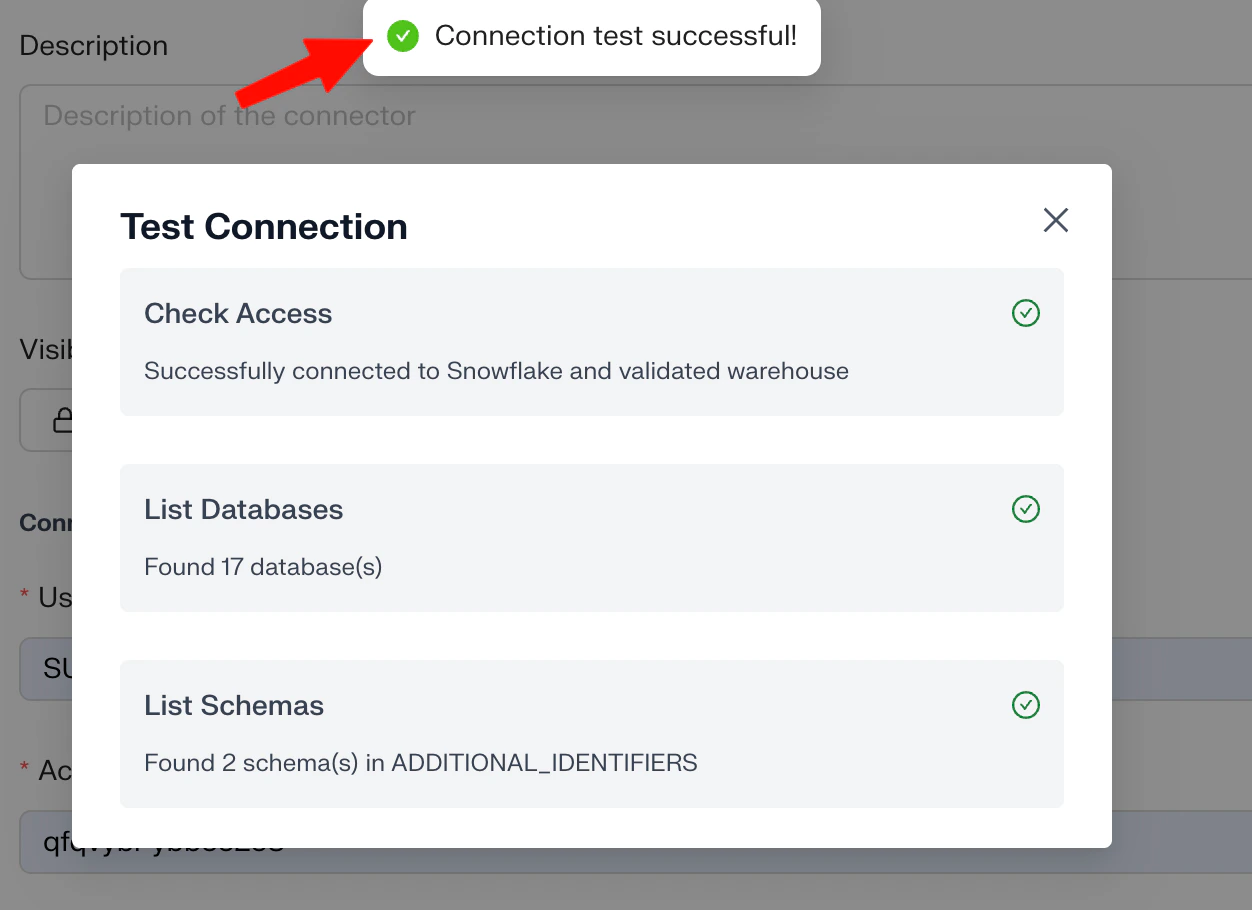
Click **Test Connector** to verify aidnn can authenticate and reach Snowflake. The test runs four checks:
* **Account validity** — the account identifier resolves to a reachable Snowflake account.
* **User credentials** — the username and PAT authenticate successfully.
* **Warehouse access** — the role can use the named warehouse.
* **Required permissions** — the role can list databases and read schemas/tables/views.
Any failures surface in the test output before you save the connector.
## 4. Test the connection
Click **Test Connector** to verify aidnn can authenticate and reach Snowflake. The test runs four checks:
* **Account validity** — the account identifier resolves to a reachable Snowflake account.
* **User credentials** — the username and PAT authenticate successfully.
* **Warehouse access** — the role can use the named warehouse.
* **Required permissions** — the role can list databases and read schemas/tables/views.
Any failures surface in the test output before you save the connector.
 ## 5. Create the connector and sync
### Step 1 - Click Add
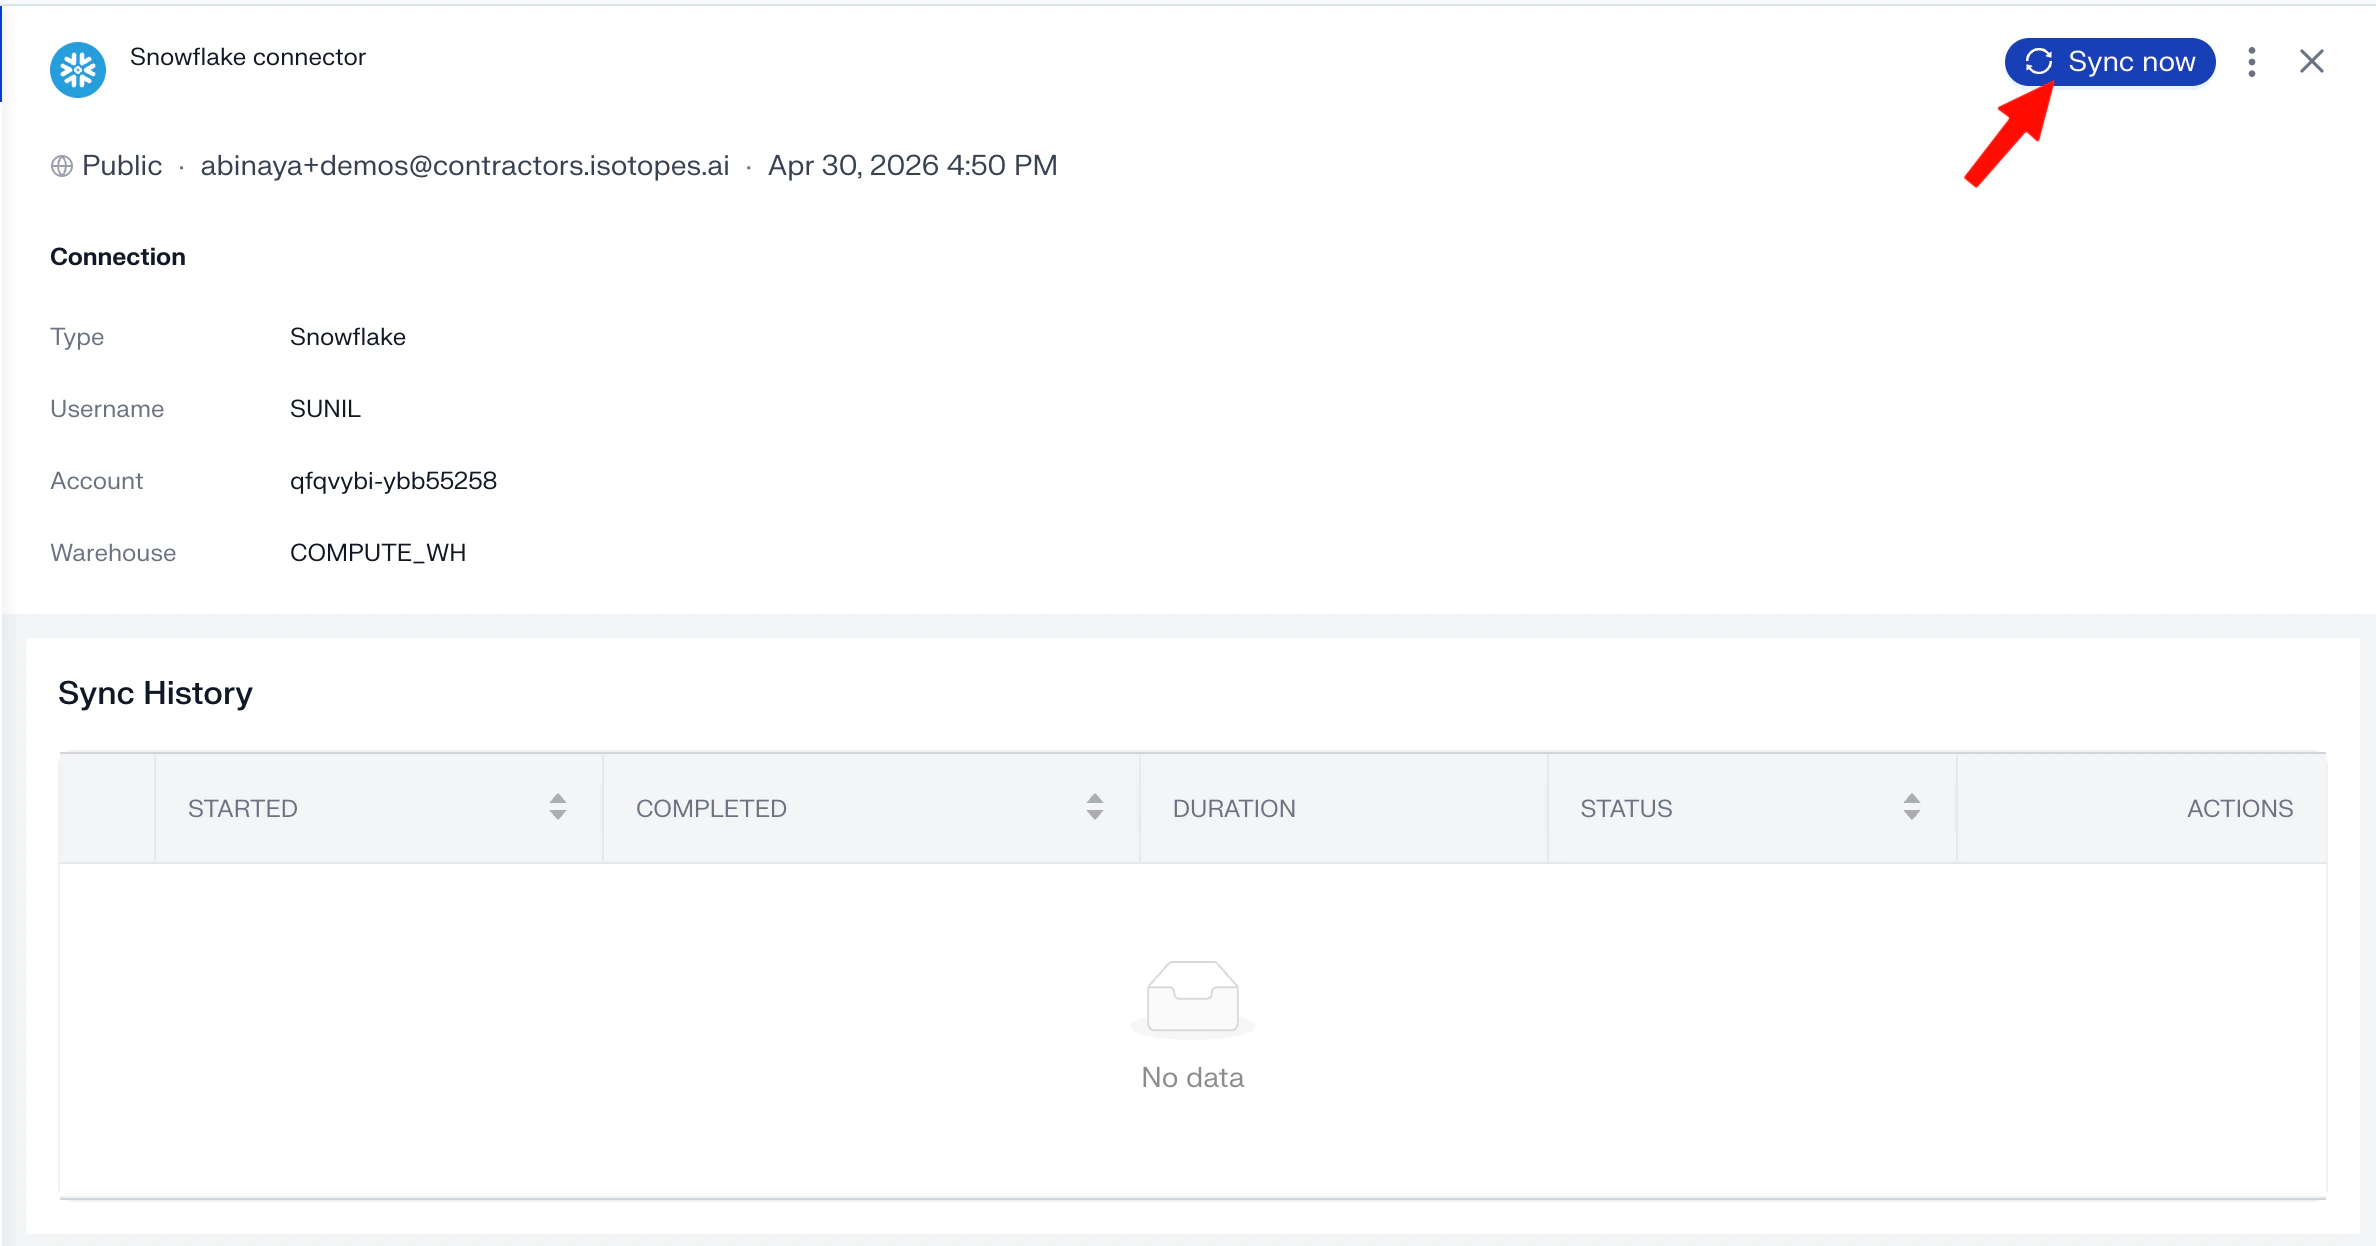
Once the test passes, click **Create** to create the connector. aidnn saves it and takes you to the connector detail page, which shows the configuration you entered.
## 5. Create the connector and sync
### Step 1 - Click Add
Once the test passes, click **Create** to create the connector. aidnn saves it and takes you to the connector detail page, which shows the configuration you entered.
 ### Step 2 - Click Sync now
On the detail page, click **Sync now** to start syncing metadata.
### Step 2 - Click Sync now
On the detail page, click **Sync now** to start syncing metadata.
 ### Step 3 - Pick the database to sync
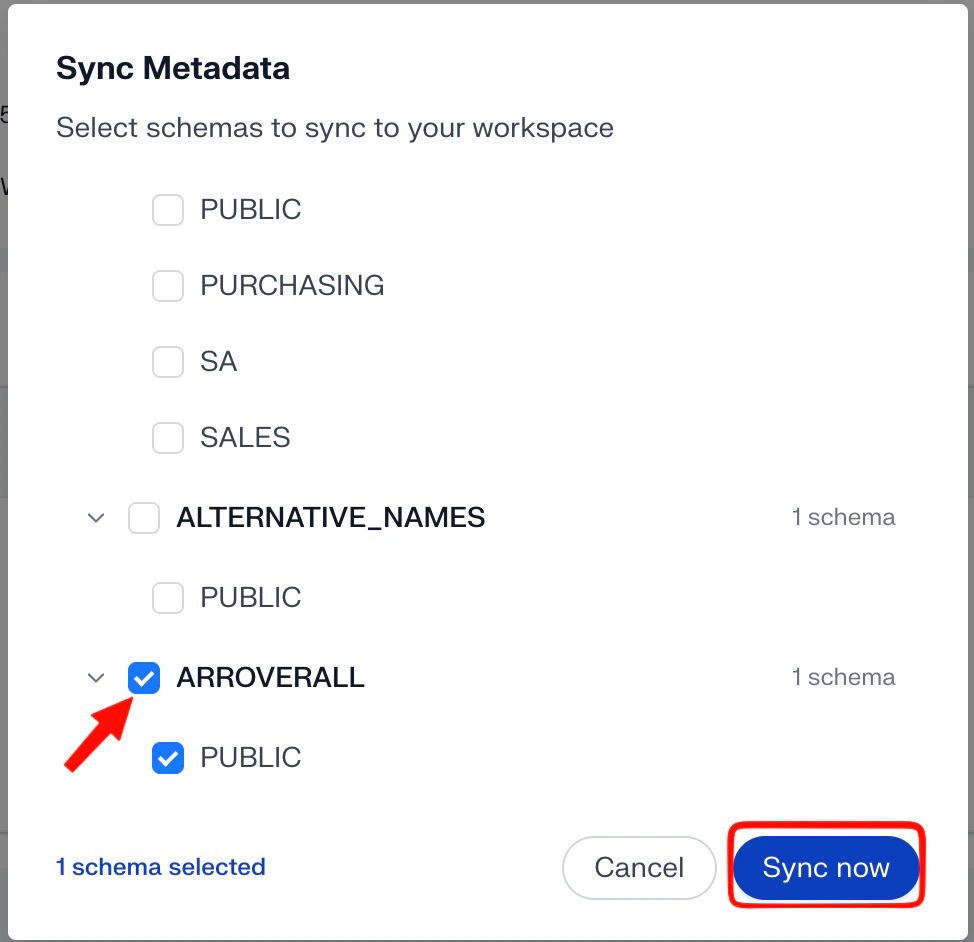
In the **Sync Metadata** panel, select the database (or databases) you want to make available through this connector. This determines which schemas, tables, and views aidnn pulls metadata for.\
Click **Sync now** in the bottom-left of the panel to kick off the sync.
### Step 3 - Pick the database to sync
In the **Sync Metadata** panel, select the database (or databases) you want to make available through this connector. This determines which schemas, tables, and views aidnn pulls metadata for.\
Click **Sync now** in the bottom-left of the panel to kick off the sync.
 ### Step 4 - Watch the workflow
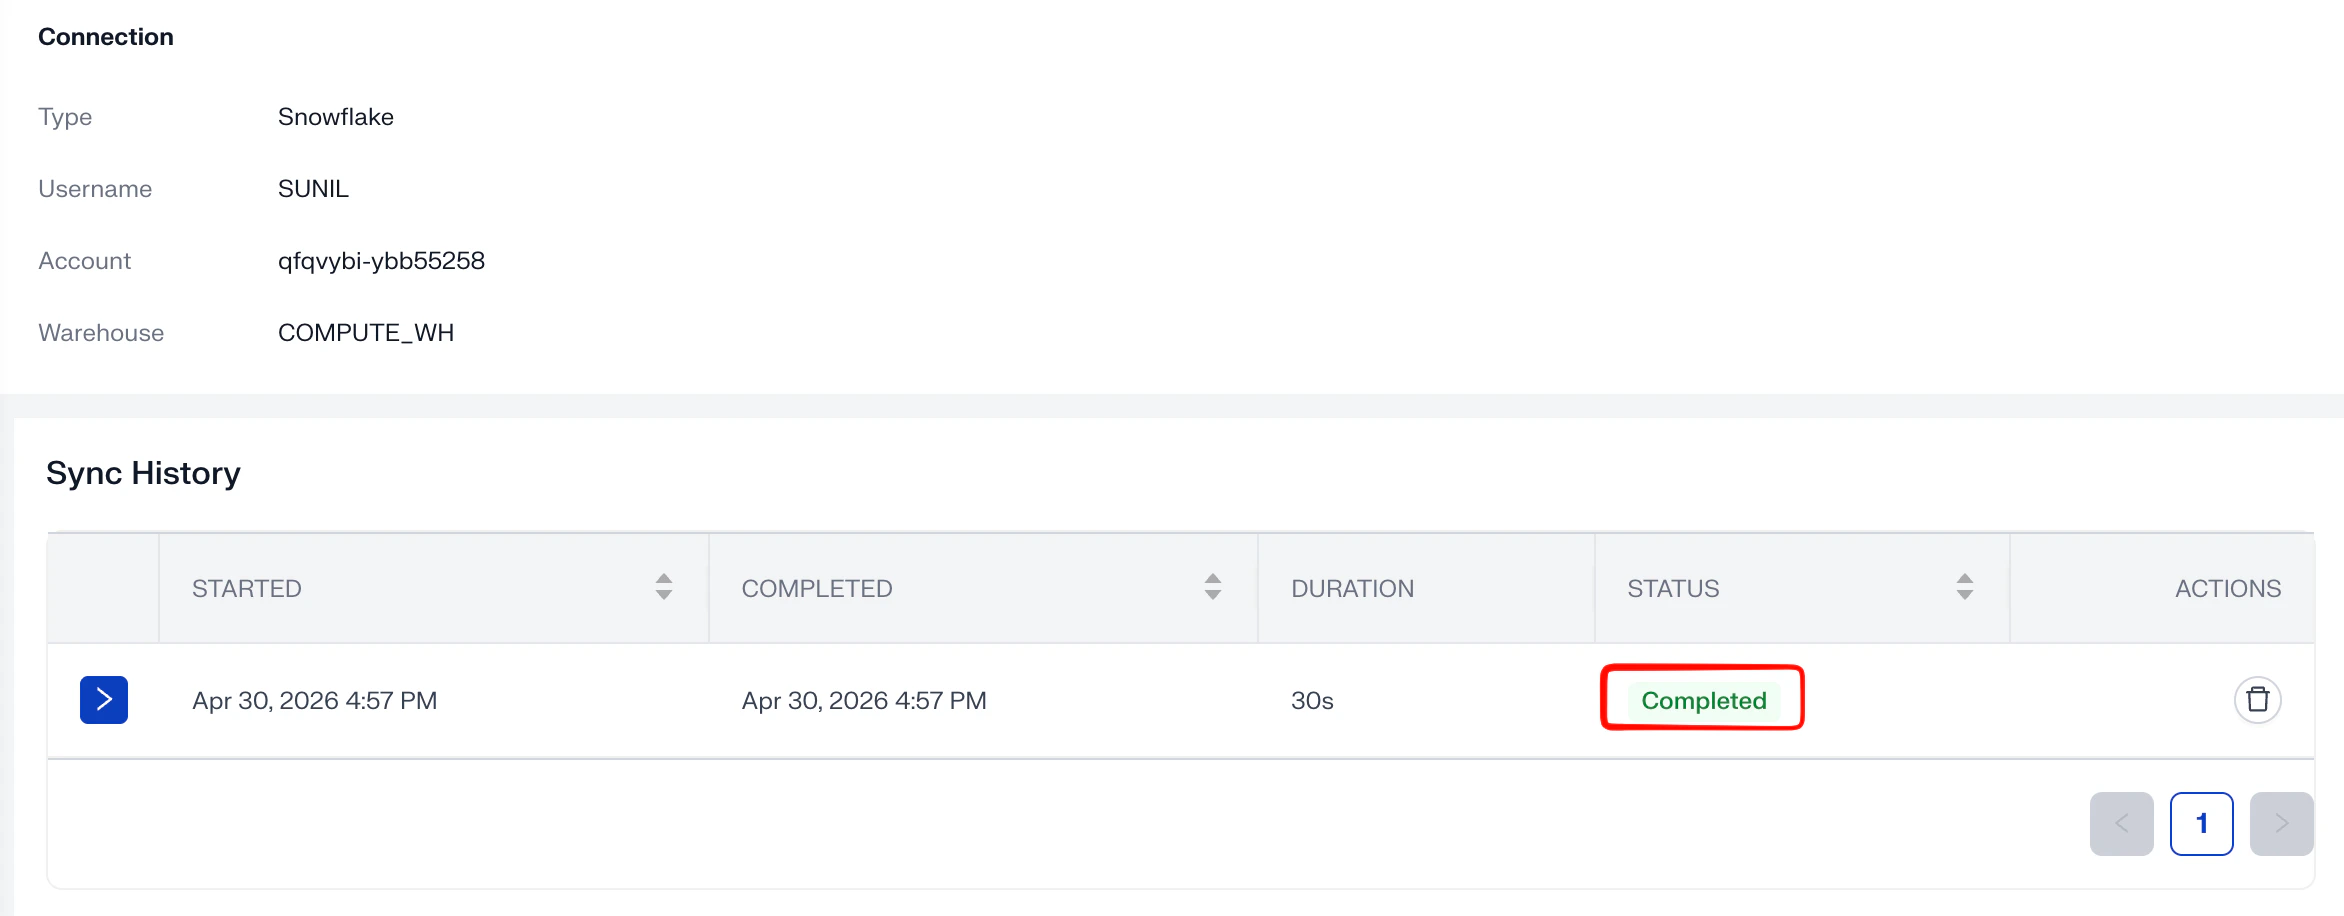
Once the sync starts:
* The run enters the workflow state and shows current progress.
* You can monitor each step as it runs.
* When it finishes, the status flips to Completed and the connector is ready to use.
### Step 4 - Watch the workflow
Once the sync starts:
* The run enters the workflow state and shows current progress.
* You can monitor each step as it runs.
* When it finishes, the status flips to Completed and the connector is ready to use.
 ## 6. Manage your Snowflake connectors
### Archive a connector
On the Connectors page, click the connector you want to archive. In the connector detail view, click the kebab menu (⋮) in the top-right and select **Archive**. This archives the entire connector and removes it from active use existing notebooks that reference it will lose access.
## Support
Please reach out to your Snowflake Admin or [support@isotopes.ai](mailto:support@isotopes.ai) for more details if you face any issues.
## 6. Manage your Snowflake connectors
### Archive a connector
On the Connectors page, click the connector you want to archive. In the connector detail view, click the kebab menu (⋮) in the top-right and select **Archive**. This archives the entire connector and removes it from active use existing notebooks that reference it will lose access.
## Support
Please reach out to your Snowflake Admin or [support@isotopes.ai](mailto:support@isotopes.ai) for more details if you face any issues.